I won?!

6

Tuesday, July 31, 2012

My Andes Mint Chocolate Chip Cake won the Unique Sweets Challenge over at White Lights on Wednesday and My Happy Place! I'm completely shocked but very honored! Thank you so much Julie & Sophie for inviting me to enter, thank you judges for picking my cake, and thank you sponsors for all of the lovely prizes!!! You guys made my day!

To see more about the challenge and to see the other tasty winners, click on the image below:

Banana Chocolate Chip Muffins

6

Friday, July 27, 2012

Yesterday I woke up and discovered that our bananas were far too brown to eat. I wanted to make something I could have for breakfast so I mashed them up and made these really easy banana muffins (adapted from my Mom's banana bread recipe). Normally I'd top them with nuts but I had a small amount of mini chocolate chips up in the cupboard so I tossed them in. I'm glad I did! They turned out to be way more delicious than expected! Banana and chocolate, how could you go wrong? I can definitely see myself making these again! Enjoy and happy Friday!

Banana Chocolate Chip Muffins
Ingredients
1¼ c. all-purpose flour
½ c. + 2 tbsp. granulated sugar
1 large egg
1 c. very ripe bananas, mashed (1-2)
¼ c. (4 tbsp.) butter, room temperature
¼ c. buttermilk
½ tsp. baking soda
½ tsp. salt
½ tsp. vanilla
½ c. mini chocolate chips

DIRECTIONS:
1. Preheat oven to 350 degrees F. Prepare a muffin tin with spray or 12 paper liners.
2. In the bowl of a stand mixer, beat together sugar and butter. Add egg and vanilla, beating just until incorporated.
3. Mash bananas on a plate using a fork. Add bananas to the butter-sugar mixture. Beat until smooth.
4. In a medium size mixing bow, whisk together flour, baking soda, and salt. With mixing speed on low, alternate dry ingredients with buttermilk. Mix until combined. Remove bowl from stand and fold in chocolate chips, saving a few to sprinkle on top of each muffin.
5. Pour batter into prepared muffin tin, filling each ⅔ of the way full (sprinkle chocolate chips on top if desired).
6. Place in oven and bake for approximately 22-25 minutes, or until a cake tester inserted into the center comes out clean and the muffins tops are golden brown. Remove from oven and let cool for 10 minutes, then transfer muffins onto wire rack to cool completely.
Stephen + Natalie Family Recipe | Makes approximately 12 muffins

Peanut Butter & Jelly Bars

5

Tuesday, July 24, 2012

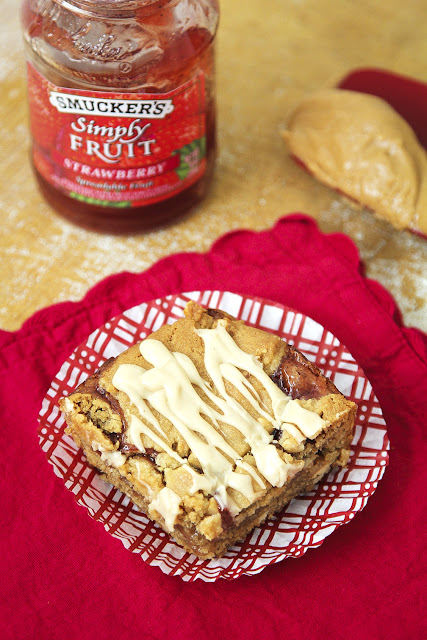
To this very day one of my favorite things to eat for lunch is a peanut butter and jelly sandwich. I know most people probably stopped eating them after elementary school, but I could and would eat one every day, just ask Stephen. He loves to tease me when I can't find anything to eat and I go directly to the cupboard and grab the jar of peanut butter. That said, when I stumbled upon this recipe I knew it was for me. It's everything I love about PB & J but baked into delicious little bars + it's quick to fix and you'll most likely have the ingredients on hand. I adapted the recipe to better suit our tastes and it has turned out to be one of my favorite treats I have baked thus far! This recipe is really kid-friendly but is also great for adults too... just make sure you have a glass of milk nearby, you'll need it!

Peanut Butter & Jelly Bars
Ingredients
1½ c. all-purpose flour
½ c. sugar
½ c. brown sugar
1 egg
8 tbsp. (1 stick) unsalted butter, room temperature
½ c. creamy peanut butter
⅓ c. dry roasted peanuts, chopped
¾ tsp. baking soda
½ tsp. baking powder
¼ tsp. salt
¼ tsp. vanilla
⅔ c. jam + ½ tsp. corn starch (mix together)

Peanut butter drizzle:
½ c. powdered sugar
¼ tsp. vanilla
1½ tsp. peanut butter
1 tbsp. milk, warmed

DIRECTIONS:
1. Preheat oven to 350 degrees. Line a 8x8 baking pan with parchment paper. Set aside.
2. In a medium size mixing bowl, whisk together flour, baking soda, baking powder and salt. Set aside.
3. In the bowl of a stand mixer, combine butter, sugars and peanut butter. Beat till smooth, approximately 1-2 minutes. With mixing speed on low, add egg and vanilla, mix until incorporated.
4. Slowly begin to add dry ingredients. Mix until just combined. Remove bowl from stand and fold in chopped peanuts.
5. Press ⅔ of the dough into the bottom of the prepared pan. Then pour jam mixture on top. Smooth out. Place remaining dough in dollops over the jam. Bake for 35-40 minutes or until the top begins to brown. Remove from oven and let cool for 30 minutes.
6. Meanwhile, to prepare the drizzle, in a glass measuring cup, warm milk in microwave (10 seconds, on HIGH). Add vanilla and peanut butter, mix until smooth. Gradually add in powdered sugar. Once the mixture is smooth, drizzle over the cooled bars. Cut and serve.
Adapted from The Back In The Day Bakery Cookbook, PB & J Bars | Makes approximately 9-12 bars

Andes Mint Chocolate Chip Cake

19

Sunday, July 22, 2012

A couple of weeks ago I received an email from Julie over at White Lights on Wednesday. She invited me to enter her Unique Sweets baking challenge along with several other bloggers. At first I had a hard time thinking of something unique to bake, you know, something that required some skill and that wasn't very common. That's when I thought about making this cake.

Growing up I remember my mom taking me to my dad's work at the car dealership. He and my grandfather worked alongside one another so it was always fun to go see the two of them. I'd always leave with a few Andes mints in hand, a chocolate candy I still love today- yes, I get excited about getting them after eating at Olive Garden... what can I say? I'm not sure why there was always an excess of them, but it was definitely something I loved about visiting their work. The chocolate mint obsession is certainly something that has carried over to every member of my family. Our freezer is always stocked with a half gallon of mint ice cream and around Christmas my mom makes these amazing chocolate mint cookies that everyone we know craves. So I thought to myself, what haven't we tried/made with mint in it? Cake. I'm not particularly confident when it comes to baking cakes, especially multi-layered cakes. It seems like the cake always ends up sticking to the pan, or the levels are uneven and need to be cut down to look right. Regardless of my anxieties, I got to baking.
----------------------------------------------------------------------------------------------------------------
----------------------------------------------------------------------------------------------------------------
I started off by slightly adapting one of my mother-in-law's chocolate cake recipes. I baked it in three 9x2" round pans, there was no cutting or leveling required. I followed some very good advice to place buttered and floured parchment paper at the bottom of each pan. The cakes came out clean and crumb-free.

Next I whipped up a batch of peppermint buttercream. I tinted it with some AmeriColor soft gel paste (Avocado 129 + a few drops of Wilton green) and then added a fair amount of peppermint oil to give it that refreshing minty flavor. Because I was unable to find Andes Mint Baking Pieces, I bought a few sleeves of the whole candies and chopped them finely. I folded them into the buttercream and frosted the cake. I followed this tutorial over at Whisk Kid, it's full of good tips and tricks!

Then came the topping. I'm a huge fan of ganache, especially when it's paired with mint! So I made a batch of a thick and silky ganache and poured it over the top of the cake. To give it a little extra shine, I sprinkled it with luster dust.

Lastly I wanted something eye-catching in the middle. I thought about just piping some frosting and placing some Andes in the center, but instead I made mint bark. It only took a few minutes to prep, make and chill, but it tastes excellent and gives the cake a more dramatic look. Overall I'm incredibly pleased with how it turned out. Not only does it look fantastic, but it tastes absolutely delicious! If a novice cake-baker like me can put this cake together in less than an hour and have it turn out perfectly, you can do it too!


Chocolate Cake
1 c. unsweetened cocoa powder
2¾ c. all-purpose flour
2½ c. sugar
1 c. (2 sticks) unsalted butter, room temperature
4 eggs
2 c. boiling water + ¾ tsp. espresso powder (dissolved)
2 tsp. baking soda
½ tsp. baking powder
½ tsp. salt
1 tsp. vanilla

DIRECTIONS:
1. Preheat oven to 350 degrees. Line three 9x2" round baking pans with parchment paper. Butter and flour the bottom and edges to prevent cakes from sticking. Set aside.
2. In a medium size mixing bowl, combine flour, baking soda, baking powder and salt. Whisk together until combined. Set aside. In a separate bowl, whisk together hot water (with dissolved espresso powder) and cocoa powder. Once smooth, set aside.
3. In the bowl of a stand mixer, beat together butter, sugar, vanilla and eggs (for about 4-5 minutes). Turn speed to low and begin alternating dry ingredients with cocoa mixture (adding about ⅓ of each at a time). Mix until combined.
4. Divide and pour mixture evenly into the three prepared pans. Place in oven and bake for 25-30 minutes or until the top of the cake is firm and has some spring to it. Remove from oven and cool for 10-15 minutes in the pan. Turn onto a wire rack to cool completely.
----------------------------------------------------------------------------------------------------------------
Andes Mint Buttercream
16 tbsp. (2 sticks) unsalted butter, room temperature
4½-5 c. powdered sugar
1/4 tsp. peppermint oil
1 tsp. vanilla
1-2 tbsp. heavy cream
¼ tsp. salt
¾ c. chopped Andes
2-3 drops green food coloring

DIRECTIONS:
1. In the bowl of a stand mixer, beat butter for 1-2 minutes. Add peppermint oil, vanilla and salt. With mixing speed on low, gradually add powdered sugar. Then add heavy cream and food coloring. Beat until fluffy (3-4 minutes). Remove bowl from stand and fold in chopped Andes pieces.
----------------------------------------------------------------------------------------------------------------
Chocolate Ganache
⅓ c. unsweetened chocolate (60% cocoa)
⅓ c. heavy cream
2 tbsp. butter
¹⁄₈ tsp. vanilla

DIRECTIONS:
1. Over a double broiler melt butter, heavy cream and chocolate. Once mixture has reached a smooth and silky consistency, remove from heat and add vanilla. Allow to cool for 5-7 minutes before pouring over frosting.
----------------------------------------------------------------------------------------------------------------
Homemade Andes Bark
½ c. dark chocolate
1 c. white chocolate
¹⁄₈ tsp. peppermint oil
8-10 Andes, chopped
1-2 drops green food coloring

DIRECTIONS:
1. Over a double broiler melt dark chocolate until smooth. Remove from bowl and pour into a parchment-lined 8X8 square pan. Refrigerate for 5-10 minutes. Meanwhile, melt white chocolate. Remove from heat when smooth and add in food coloring and mint extract. Pour over cooled dark chocolate. Smooth out and top with chopped Andes. Refrigerate for 10-15 minutes before cutting.
Adapted from Baker's Royale, Mint Chocolate Chip Bark

Sophie N Me Handmade Greeting Cards Winner Announced!

0

Saturday, July 21, 2012

CONGRATULATIONS!


Please e-mail me your address at nataliedicks@gmail.com.

Thanks again to all who entered 


Biscoff Oatmeal Raisin Cookies

1

Wednesday, July 18, 2012

Ever since I made those Biscoff cupcakes, I've been thinking of ways to incorporate the spread into other treats. Since it has such a nice sweet and spiced flavor to it, I thought it would be the perfect little kick in some oatmeal raisin cookies. When I was making the dough, I started off by adding a few tablespoons and then quickly realized that in order to really taste it I needed to add a few more. I'm glad I did! Don't be alarmed by the shape of these as they do not bake flat. They're puffy with crunchy exteriors and have centers that are moist and full of juicy raisins (think scone-like). They'd be perfect for an early morning snack or a late night treat. Enjoy!

Biscoff Oatmeal Raisin Cookies
Ingredients
1½ c. flour
1 c. sugar
1 c. brown sugar, packed
14 tbsp. (1 ¾ sticks) butter, room temperature
½ c. Biscoff spread
2 eggs
½ tsp. baking powder
½ tsp. salt
½ tsp. vanilla
¼ tsp. nutmeg
¼ tsp. cinnamon
3 c. old-fashioned rolled oats
1 ½ c. raisins

DIRECTIONS:
1. Preheat oven to 350 degrees. Line a baking sheet with parchment paper. Set aside.
2. In a medium size mixing bowl, combine flour, oats, baking powder and salt. Whisk together and set aside.
3. In the bowl of a stand mixer, beat together butter, Biscoff spread and sugars until light and fluffy (2-3 minutes). Add eggs one at a time, mixing after each addition until combined. Add vanilla, nutmeg and cinnamon. Mix until incorporated.
4. With mixing speed on low, gradually add in dry ingredients. Once combined, remove bowl from stand and fold in raisins.
5. Using a large cookie scoop, place 2" balls of dough approximately 2" apart from each other on the prepared sheet. Slightly pat down with the palm of your hand or the bottom of a glass cup. Place in oven and bake for 20-22 minutes, rotating the sheet half way through the baking process. Do not over bake!
6. Remove from oven and let cool on pan for 3-5 minutes. Transfer to a wire rack to cool completely.
Adapted from The New Best Recipe, Chewy Oatmeal-Raisin Cookies | Makes approximately 20 large cookies

Sponsored Giveaway: Sophie N Me Handmade Greeting Cards [CLOSED]

3

Tuesday, July 17, 2012

We're teaming up with Jennifer over at Sophie N Me to giveaway some handmade greeting cards! A few weeks ago I had the opportunity to collaborate with her and redesign her blog. She said thank you with a package full of cards! Some for me, and some for you! They're quite adorable and perfect in every way- see for yourself:

 »To enter to win, please follow Life {Made} Simple here on Blogger or on Facebook.
Oh, and please leave a comment below so we know who you are and how to find you!
 We will draw a random, lucky winner this Friday, July 20th. Good luck!


Don't forget to stop by Sophie N Me's Etsy shop. All cards are 20% off now until July 22nd!

Biscoff Gourmet Cupcakes

21

Monday, July 16, 2012

One of my favorite things about flying on Delta is getting those addicting Biscoff cookies mid-flight. Usually Stephen and I will eat them in a matter of minutes, but during this past trip I had multiple connections, enabling me to build up a little stash. I know I'm not the only one who has thought of ways to use these cookies, but since we also have Biscoff spread, I thought I'd try making cupcakes with Biscoff flavored buttercream. When I mentioned making these to Stephen he seemed skeptical. After taking a bite of one, he was hooked and I was smitten! What's not to love?

Biscoff Gourmet Cupcakes
Ingredients
1 c. all-purpose flour
¾ c. sugar
¼ c. brown sugar
½ c. (1 stick) unsalted butter, room temperature
2 eggs
½ c. + 2 tbsp. sour cream
3 tbsp. whole milk
½ c. Biscoff spread (creamy*)
¼ c. Biscoff cookies, crumbled
1 tbsp. vanilla extract
¼ tsp. salt
½ tsp. baking soda
¼ tsp. cinnamon

Biscoff buttercream frosting:
½ c. (1 stick) unsalted butter, room temperature
⅓ c. Biscoff spread
1½ tsp. vanilla extract
¹⁄₈ tsp. salt
1½ c. powdered sugar
1½ - 2 tbsp. heavy cream

Topping:
Biscoff cookies for garnish

DIRECTIONS:
1. Preheat oven to 350 degrees. Line a muffin tin with paper liners. Set aside.
2. In a medium size mixing bowl, add flour, salt and baking soda, whisk to combine. Set aside.
3. In the bowl of a stand mixer, beat together butter, sugars, sour cream and Biscoff spread. With mixing speed on low, add eggs one at a time until incorporated.  Add milk, vanilla, cinnamon, mix.
4. Add dry ingredients just until combined, about 30 seconds. Remove bowl from stand and fold in cookie pieces.
5. Scoop batter into prepared pan, filling each liner ¾ of the way full. Place in oven and bake for 18-22 minutes or until a toothpick inserted into the center comes out clean. Remove and place on a wire rack to cool for 10 minutes. Remove cupcakes from pan and allow to cool completely (25-30 minutes).
6. While the cupcakes are cooling, prepare buttercream frosting. In the bowl of a stand mixer, beat the softened butter and biscoff spread on medium speed until light and fluffy. Add vanilla extract and mix well.
7. Turn speed to low and being to add the powdered sugar (it will look like bread dough). Once the powdered sugar is added, pour the milk a little bit at a time, while mixer is on. Mix until combined. Add milk until the frosting reaches desired consistency (it should be rather stiff). Beat on medium-high speed for 4-6 minutes until fluffy. Frost cooled cupcakes as desired.
* I was unable to find creamy at my local supermarkets, so I used crunchy. Only the texture of the frosting will change if using crunchy.
Stephen + Natalie | Makes approximately 12 cupcakes / frosting for 12 cupcakes

Kitchen Notepads

0


Apparently I wasn't thinking when I uploaded the Kitchen Notepads to the blog. I realize now that they looked very similar to the Knock Knock notepads, too similar. This was my mistake for doing so.

I would like to apologize to Knock Knock for interpreting its pads All Out Of, What to Eat, and Recipe Notes as our own in my post dated July 9, 2012. In exchange for removing the post and destroying the PDFs, Knock Knock has graciously agreed not to pursue legal remedies for this matter. If you downloaded the PDFs from the post before it was taken down, we ask you please not to use them or link to them. My apologies to Knock Knock.

Caramel Pecan {Turtle} Brownies

21

Friday, July 13, 2012

Last week when I was at Target, I stumbled upon mini Rolos. Stephen and I love trying new candy so I grabbed a few small bags of them and went on my way. When I got home I opened one of the bags and realized that they were about ¼" smaller than the normal ones. I was slightly disappointed because I was expecting them to be small enough to go in cookies. So I scratched the idea of cookies and decided to make brownies with them. I've always loved turtle cheesecake and turtle candies, so I melted down the Rolos, combined them with additional caramel, chocolate and nuts, and created turtle brownies. The brownie itself is neither too fudgy or cakey. It is however, rich, and of course the topping only adds to it. I think this was a great way to liven up brownies! I think you'll agree too!

Caramel Pecan {Turtle} Brownies
Ingredients
1 c. (2 sticks) unsalted butter
2 c. granulated sugar
1 tbsp. vanilla extract
4 large eggs
¾ c. cocoa powder (Hershey's)
1 c. all-purpose flour
½ tsp. baking powder
¼ tsp. salt
½ tsp. espresso powder

Topping:
1½ c. Rolo chocolate candies, (melted in a microwave safe bowl
with 1 tbsp. butter + 2 tbsp. heavy cream and mixed until smooth)
⅓ c. caramel ice cream topping
½ c. chopped pecans
½ c. mini chocolate chips
chocolate ganache (2 oz. bittersweet chocolate, finely chopped +
¼ c. heavy cream, melted and mixed until smooth)

DIRECTIONS:
1. Preheat oven to 350°F. Line a 9 x 13 pan with parchment paper. Set aside.
2. In a medium saucepan, heat butter over medium heat until melted. Gradually add sugar until it begins to dissolve. Remove from heat and stir in espresso powder and vanilla extract. 
3. Add eggs, one at a time, mixing well with a spatula or wooden spoon after each addition.
4. In a medium mixing bowl, combine flour, cocoa, baking powder and salt; whisk until combined. Slowly pour into wet ingredients, mix until combined (scrape the bottom of the bowl and the sides to make sure you get all of the dry pockets). Stir in ¼ c. mini chocolate chips and ¼ c. pecans. Pour batter into prepared pan.
5. Drizzle caramel evenly over the brownies. Using a toothpick, swirl caramel into brownies. Bake for 35 minutes. Remove from oven and spread prepared Rolo topping over while brownies are hot. Sprinkle with remaining mini chocolate chips and pecans. Return to oven for 3-5 more minutes. Remove from oven and allow brownies to cool completely in the pan on a wire rack (30 minutes or so). Once cool, drizzle with chocolate ganache. Refrigerate for 1 hour. Cut into squares and serve.
Adapted from Two Peas & Their Pod, Caramel Twix Brownies | Makes approximately 24 small squares

From the garden

3

Thursday, July 12, 2012

As I mentioned earlier this week, we toured the Blithewold Mansion in Bristol, Rhode Island.
They had a handful of incredible gardens filled with the most beautiful flowers and a couple of critters too!

A few pictures from Rhode Island

0

Wednesday, July 11, 2012

Last Saturday we had some down time so we (me, my brother, his wife, my parents and my cousin) headed to Bristol, RI. While driving around, we stumbled upon this huge historic mansion and decided to take a tour.
There were some huge trees, several varieties, and they all had branches that touched the ground.
The back of the Blithewold Mansion. The lawn extended out to the ocean.
Joey, Mom & Dad at the marina in Bristol.
The roads in Bristol had red, white and blue lines. They're known for being a really patriotic town.
Battleship Cove. We toured a couple of battleships and submarines from WWII.
We all thought this was a really cool car!
Inside the submarine. Notice the bed in the top right hand corner... yeah, right above that torpedo.
So if you've never been in a submarine, it's tiny. I mean, incredibly tiny. Only one toilet, a kitchen the size of a linen closet and cots hanging from the ceiling. Yet towards the rear they had an ice cream machine. Random, right? To the right is the dental room. They had three different stations and a side room with an X-Ray machine. My sister-in-law really liked seeing all of this vintage dental equipment.
I love this framed newspaper article, it's even from a newspaper in Hawaii. To the right is a female officer's jacket. They had a big display of women's clothing and some interesting exhibits about their roles during the war.
I just couldn't help taking a picture of this. It's so incredible!
Later Saturday night we headed to Waterfire in downtown Providence. I didn't want to use a flash so these images are a little grainy due to the increased ISO. I think they turned out well considering it was 10:00pm.
They had fire dancers, gondolas and river tours. There was a street market that served fresh frozen lemonade and lots of Italian pastries. Despite the events that occurred just days before, we had a good end to a long weekend.

Life lately, according to instagram

1

Tuesday, July 10, 2012

Last week we were extremely busy. On the 4th I was tired and didn't feel like making dinner so we headed to Cafe Rio. We didn't want to get a late start on our hike up Y mountain (where we watched the fireworks from) so we scarfed down our food. Boy was it good // We've really missed their sweet pork, and I've missed their giant salads!
On Thursday I headed to Rhode Island to be with family. Strangers love to make comments about how bright my luggage is and how it will never get mistaken for another suitcase. The bright pink isn't really me, but it's always nice to be able to spot your bag within a matter of seconds. // I wore my new LBD- $15 from Target, such a steal!
Blessed Sacrament Church where we attended Mass in honor of my uncle. // Eating dinner with family in the house that my dad lived in when he first came to the United States. It was my first time being in that house.
 They only sell brown eggs where my family lives, kind of cool! // Pile of Biscoff cookies from all of my flights. I will definitely be using those in something! Maybe cookies, cupcakes, bars or cheesecake? Hmmm...
 Have you ever seen a red mushroom? We spotted one on our walk around a mansion in Bristol, RI. // We came to the end of the road and it went straight into the water. There was a man fishing just off the shore and while his back was turned the seagulls were eating the fish he had caught. It was so funny!
There were butterflies on the ground at the Blithewold Mansion. // Sail boats from the America's Cup.
Lighthouse turned into private residence // Waterfire (night festival) on the river in downtown Providence.
All in all it was a long and tiring week. Hopefully this week will be a little more relaxing!

Blog Redesign: Sophie n Me

1

Saturday, July 7, 2012


This past week I've been working with Jennifer, over at Sophie n Me, to come up with a more modern and clean blog design. She wanted to keep her original header, so I repurposed it and made it more functional. Since she wasn't too keen on all of that pink, I added touches of blue to help tone things down. I think we came up with something that better represents who she is and will help to better display all of those cute cards she makes!

Chocolate Chunk Cookies

5

Friday, July 6, 2012


Isn't it kind of crazy how many chocolate chip cookie recipes there are? It seems so funny to me that a slight alteration in ingredients can completely change the texture and taste of a cookie. Normally I stick to my mom's oatmeal chocolate chip cookie recipe, it's kind of a staple around here, but I was feeling a little adventurous the other day. Stephen loves a plain cookie (no oats) and I love one with chunks in it, so this recipe had our names written all over it. It's a version of a cookie from a bakery in Savannah, Georgia. Apparently people go crazy for it there. Now I know why. It has a soft inside, crunchy outside , is full of chopped chocolate and is garnished with a sprinkle of sea salt. I'm warning you: these are addicting! You may be tempted to halve the recipe but don't, you'll regret it!

Chocolate Chunk Cookies
Ingredients
2½ c. all-purpose flour
1¼ tsp. baking soda
1½ tsp. salt
16 tbsp. (2 sticks) unsalted butter, at room temperature
1½ tsp. vanilla extract
1 c. sugar
1 c. brown sugar, packed
2 eggs
1½ c. semisweet chocolate, chopped into chunks
½ c. bittersweet chocolate (60%), chopped into chunks
Fleur de sel for sprinkling

DIRECTIONS:
1. Preheat oven to 350 degrees. Line two cookie sheets with parchment paper.
2. In a large mixing bowl, whisk together flour, baking soda and salt. Set aside.
3. In the bowl of a stand mixer, beat together butter, vanilla and sugars (medium speed for 2-3 minutes). Add the eggs one at a time, mixing in between additions. Turn mixing speed to low, slowly being to add dry ingredients, ⅓ at a time. Beat until just combined (1-2 minutes). Place in refrigerator to chill for 10-15 minutes.
4. Using a large cookie scoop (or a ¼ c. measuring cup) to form the cookies. Place onto prepared sheet, leaving at least 2 inches in between. Lightly press each cookie with the bottom of a glass. Sprinkle the tops of each with a little bit of the fleur de sel.
5. Place in oven and bake for 15-17 minutes, rotating the sheet half way through the baking process. Remove from oven when cookies are golden brown in color around the edges. Let cookies cool on pan for 3-4 minutes, then transfer to a wire rack to cool completely.
Adapted from The Back In The Day Bakery Cookbook, Chocolate Chip Cookies | Makes approximately 24 jumbo (DVD size) cookies 

Our 4th of July

1

Thursday, July 5, 2012

Yesterday, Stephen and I woke up early and headed to the Kiwanis pancake breakfast. On our way there we found a couple of cup murals (bottoms of spray painted cups shoved into a fence). Just outside of the breakfast was the landing field for the hot air balloons, we were just in time to see a couple of them land.
After breakfast the parade started. The streets were crowded but we found a little spot to watch.
We saw Stephanie from the nienie dialogues.
And of course Cosmo was there getting the crowd rilled up.
Later we decided to hike the Y. We weren't the only ones with that idea.
We sat up there and let the Beach Boys serenade us from below.
The view was absolutely incredible. You could see absolutely everything!
Then we watched the fireworks and the fire. They don't call it the Stadium of fire for nothing, people.
We had such a fun and tiring day. Hope you had a happy and safe 4th of July!

Life Made Simple All rights reserved © Blog Milk - Powered by Blogger