Freshly Baked Double Doozies

0

Thursday, August 30, 2012

It wasn't until my first trip to Florida that Stephen introduced me to the double doozie. It consists of a layer of frosting sandwiched between two giant chocolate chip or M&M cookies. I had never heard of or thought of such a thing. Probably because I'm not a huge fan of frosting... a little goes a long way, people. But after taking a few bites, I began to see just how addicting these things could be! Now it seems like every time we're near a mall with a Great American Cookies, we have to pick up a few (and some unfrosted cookies for me). Earlier this week I felt like making cookies and wanted to be a little creative, so I made my own version. I'd say these are just as good as the one's you'd get from the mall, if not a little better. Enjoy!

Double Doozies
Ingredients
1¾ c. flour
1 c. brown sugar
¼ c. sugar
¾ c. butter
1 egg + 1 yolk
1½ tsp. vanilla extract
½ tsp. salt
2 tsp. corn starch
1 tsp. baking soda
1 c. mini M&Ms or chocolate chips

Filling:
2 c. powdered sugar
½ c. butter, room temperature
3-4 tbsp. milk
¼ tsp. salt
1 tsp. vanilla extract
¼ tsp. almond extract

DIRECTIONS:
1. Preheat oven to 350 degrees F.
2. In the bowl of a stand mixer, cream butter and sugars. Add vanilla and egg, mix until incorporated.
3. In a separate mixing bowl, sift flour, cornstarch, baking soda and salt. Mix in dry ingredients, one cup at a time, until smooth.
4. Add M&M's or chocolate chips, gently fold in.
5. Place cookies on sheet using a standard scoop. Bake for 8-10 minutes or until edges are golden brown. (Since I made giant cookies I used 2 scoops of dough, patted them together, put 6 on a sheet, flattened them, and baked them for 14 minutes).
6. Remove from oven and let cool on sheet for 5 minutes before transferring to a wire rack to cool completely.
7. While cookies are cooling, prepare frosting by beating together butter, milk, salt and extracts until light and fluffy. With mixing speed on low, slowly add the powdered sugar. Beat for 2-3 minutes. Pipe (or spread) onto cookies & sandwich.
Adapted from Anna Olson- Chocolate Chip Cookies | Makes approximately 2 dozen

Design 101 Series: 15 Free Fonts

2

Wednesday, August 29, 2012

As a graphic designer I'm always on the hunt for new fonts. I must say that ever since I've worked for SAS Creative Services/BYU Bookstore, I've been one of those people who can name almost any font on any given item. But every once in a while I see fonts online that I absolutely love... and happen to have no idea what they're named. So I thought I'd give you the inside scoop on my top 15 favorite fonts and identify a few popular ones...


Some great resources include: Font Squirrel, Lost TypeDaFont & Fonts 101
Please note that these fonts are for personal use only!

Easy Molten Chocolate Cupcakes

8

Tuesday, August 28, 2012

Originally a guest post over at Something Swanky
When Stephen and I first started dating we went to Chili's a lot (almost on a weekly basis). Every once in a while we'd get dessert, and when we did, it was always a molten cake. If you don't know what I'm talking about, they're kind of like mini bundt cakes with some type of warm gooey center. Sounds pretty good, right? I was a tad bit obsessed with them. Since we don't live close to a Chili's anymore, I decided it was probably time to try making them on my own. I came up with these super easy molten chocolate cupcakes. They bake up nicely, are quick to assemble and are sure to please anyone who is lucky enough to get their hands on one!

Molten Chocolate Cupcakes
Ingredients
¾ c. unsweetened cocoa powder
1½ c. all-purpose flour
1½ c. granulated sugar
1½ tsp. baking soda
¾ tsp. baking powder
¾ tsp. salt
2 large eggs
¾ c. warm water + ¼ tsp. espresso powder
¾ c. buttermilk
3 tbsp. canola oil
1 tsp. vanilla

12 Lindt Lindor Truffles (the kind is up to you!)
Unsweetened cocoa powder for dusting

Chocolate whipped cream:
1 c. heavy cream
4 tsp. confectioners sugar
2 tsp. unsweetened cocoa powder
Pinch of salt

DIRECTIONS:
1. Preheat oven to 350 degrees. Prepare one cupcake pan by spraying with Pam and then lightly dusting with cocoa powder (tip: cocoa is a great alternative to flour when prepping a pan for chocolate cake or bread), set aside.
2. In a medium size mixing bowl, whisk or sift together flour, cocoa powder, sugar, baking soda, baking powder, and salt.
3. In the bowl of a stand mixer, add eggs, warm water w/ espresso powder, buttermilk, oil, and vanilla. Mix on medium speed until smooth. Turn down speed to low and slowly add the dry ingredients to the wet mixture. Mix until smooth (no flour/cocoa pockets remain), about 3 minutes.
4. Divide batter evenly among cups, filling ¾ of the way full. Place in oven and bake for 18-21 minutes, or until the tops spring back when touched and a cake tester comes out clean. Be careful not to over bake!
5. Remove from oven, allow them to sit for 3-4 minutes in the pan, and then transfer them to a wire rack.
6. Using a cupcake corer or a knife, remove the center of each hot cupcake. Place a truffle inside and then place top back on. Let cool while preparing the whipped topping.
7. In the (chilled) bowl of a stand mixer, on high, beat together heavy cream, confectioners sugar, cocoa powder and salt for approximately 2-3 minutes (or until mixture becomes stiff).
8. Turn cupcakes upside down (be careful, you'll want to make sure that you plugged them up good to prevent leaks). Dust with cocoa powder, then top with chocolate whipped cream. Serve immediately!
Stephen + Natalie | Makes approximately 12 molten cupcakes

Strawberries & Cream Bread

3

Thursday, August 23, 2012

Lately I've been craving strawberries, am I the only one? I think I've bought 3 boxes from Harmons this week. I may or may not have eaten ¾ of them by myself. Anyway, I opened the fridge and the few that were left were starting to get mushy. Since I'm a big texture person and I have a hard time eating mushy fruit, I decided to toss them in some sweet bread. Instead of making a standard loaf, I got out my mini loaf pan (which I love!) and made a batch of bite-sized minis (and a few muffins too). This bread is incredible versatile and would work really well with peaches or blueberries too. But... if you're going to make some, do it will strawberries first, I think you'll be very pleased! Enjoy ☺

Strawberries & Cream Bread
Ingredients
2 c. all-purpose flour
1 c. sugar
½ c. (1 stick) butter, room temperature
4 oz. cream cheese, room temperature
2 eggs
6 tbsp. strawberry yogurt (or plain)
1 tbsp. milk
2-3 tsp. lemon juice
Zest of 1 lemon
1½ tsp. vanilla
½ tsp. salt
2 tsp. baking powder
½ tsp. baking soda
1¼ c. strawberries, rinsed, dried and chopped

DIRECTIONS:
1. Preheat oven to 350 degrees. Prepare desired pan (mini loaf pan or muffin tins) by greasing/flouring it.* Set aside.
2. In the bowl of a stand mixer, on medium speed, beat together butter, cream cheese, yogurt, milk and sugar (approximately 2-3 minutes).
3. Add one egg at a time, mixing well after each addition. Add vanilla, lemon juice, and lemon zest. Mix until incorporated.
4. In a medium size bowl, whisk together flour, salt, baking soda and baking powder. With mixing speed on low, gradually add dry ingredients. Mix until just combined.
5. Remove bowl from stand, gently fold in strawberry pieces. Scoop dough into prepared pan. Place in oven and bake for 20-22 minutes, or until the top of the bread is golden brown in color. 
6. Remove from oven and let cool in pan for 10 minutes. Remove from pan and place onto a wire rack to cool completely (20-30 minutes).
*For a 9x5 loaf, bake for 55-60 minutes
Adapted from My Baking Addiction, Fresh Strawberry Bread | Makes approximately 1 standard loaf, 10 mini loaves or standard 24 muffins

Mini Apple Pie A La Mode

18

Tuesday, August 21, 2012

After a few days of unpacking and cleaning, things are finally looking and feeling like home. We invited Stephen's brother over for dinner this past Sunday to enjoy our new space with us. I asked him what he'd like for dessert and he said something involving either ice cream or apple pie. So I broke out my Breville mini pie maker and went to work. I was a little unsure about how to make the filling tender, so I precooked it for 10-15 minutes until the apples began to soften. I scooped the filling inside, cooked the pies for about 10 minutes and they were ready to eat! These little guys are simple, delicious and absolutely perfect with a scoop of vanilla ice cream!

Mini Apple Pie(s)
Ingredients
1 package (2 rounds) Pillsbury pre-made pie crust
2 large Granny Smith apples, peeled and diced
2 tbsp. butter
1 tbsp. sugar
1 tbsp. brown sugar
¼ c. + 2 tbsp. heavy cream
¼ c. whole milk
¹⁄₈ tsp. vanilla
½ tsp. corn starch
½ tsp. cinnamon
¹⁄₈ tsp. ginger
¹⁄₈ tsp. nutmeg
¹⁄₈ tsp. all spice

DIRECTIONS:
1. In a large skillet over low heat, melt butter. Add apples and cook for 8-10 minutes. Sprinkle corn starch over top. Turn heat up to med-low. Add cream, milk, vanilla and sugars. Cook for 3-4 minutes until mixture begins to thicken.
2. Once mixture has thickened, add spices. Keep mixture over low heat while preparing pie crust.
3. Cut out shapes (4 tops, 4 bottoms). Place bottoms into heated pie maker. Press. Scoop ⅓ c. of mixture into each well. Place a top on each, close and bake for 10-12 minutes. Remove from pie maker and let cool for 5 minutes before serving.
Stephen + Natalie | Mini Pie Maker Recipe | Makes approximately 4 mini pies

Avocado Black Bean & Corn Salsa

2

Friday, August 17, 2012

Back in June my brother invited us over to his house for a BBQ and his wife made a version of this salsa. Ever since then I've been crazy about it, like seriously craving it. Corn, black beans, tomato, avocado... how can one go wrong? It's salsa but better! If only it could be made in single servings... ah, one can dream, right? Well, the other day the opportunity arose and I was able to make a big ole batch of it. I had planned on making a new potato salad to take to a picnic but since we were rushed and the kitchen was 80% cleaned & packed, I decided this would be a whole lot easier. I'd say it was the perfect appetizer. Light, filled with veggies and full of favor. The lime juice did its job and kept the avocado from browning (also keeping the pit in helped), so it was pretty and colorful too. Whether you're making some for your family or for a large crowd, everyone is going to love it!

Avocado Black Bean & Corn Salsa
Ingredients
1 can (15 oz) black beans, rinsed and drained
1 can (15 oz) corn, rinsed and drained
3 tomatoes, diced
2 avocados, diced
1 lime, juiced
½ of a small red onion, diced
1 jalapeno pepper, minced
1 clove garlic, minced
¼ c. fresh cilantro
¼ tsp. freshly ground pepper
½ tsp. salt
¼ tsp. Lowry's Seasoning Salt

DIRECTIONS:
1. Prepare ingredients and combine in a large bowl. Dress with lime juice and toss in seasonings. Place pit of the avocado in the bowl until ready to serve. 
Stephen + Natalie | Gluten Free | Makes approximately 10 servings

No-Bake PB Chocolate Oatmeal Cookies

5

Thursday, August 16, 2012

Ahh, the perfect on-the-go treat. These little guys only take 15 minutes to make, start to finish! They're great if you don't have a lot of ingredients around and there is absolutely no need to turn on your oven. Awesome, right?! Another thing I love about this recipe is that you don't have to have chocolate chips on hand. For me it seems like I always think I have chocolate chips on hand when in reality I don't... wishful thinking perhaps? However, you can substitute the cocoa powder for them if you really want to. Anyway, I'm really glad I made these and that they tuned to be so tasty! I'm always looking for yummy no-bake recipes and this one is definitely a keeper.

No-Bake Peanut Butter Chocolate Oatmeal Cookies
Ingredients
4 tbsp. (¼ stick) butter
¾ c. sugar
¼ c. milk
2 tbsp. cocoa powder (natural or Dutch process)
¼ c. peanut butter, heaping
1½ c. quick cooking oats
¼ tsp. salt
¾ tsp. vanilla

DIRECTIONS:
1. In a medium saucepan over medium heat, melt butter. Add salt and sugar, cook for 2-3 minutes or until sugar has dissolved (for the most part).
2. Add milk and cocoa powder, whisk until smooth. Bring mixture to a low simmer. Simmer for 2-3 minutes. Remove from heat and pour in vanilla. Then add peanut butter. Mix until smooth. Add oats and mix until completely coated with the peanut butter chocolate mixture.
3. Using a small cookie scoop, place balls of dough onto a cookie sheet lined with wax paper. Pat down with the palm of your hand to flatten (if desired). Refrigerate for 5-10 minutes or until cookies are set.
Adapted from Morgan Moore, Chocolate Oatmeal No-Bake Cookies | Makes approximately 12 cookies

Butterscotch Pecan Cookies

0

Friday, August 10, 2012

I've been searching all over for butterscotch recipes. Cookbooks, magazines, the internet, you name it. Why? It's one of Stephen's favorite ingredients. So when I came across Martha Stewart's version of Schrafft's Butterscotch Cookies, I knew I had to try it. The reviews/comments on it were mixed. Some people said they loved it while others complained that it produced cookies that were far too greasy. I also notice that butterscotch chips were missing from the ingredients, and that simply would not do. So I made some alterations, cut way back on the butter and waited to see how they turned out. Overall I was well pleased. I knew they'd be flat and I knew they'd be slightly crunchy on the outside, but I was ok with that. The flavor was there and the grease was not. Thankfully I remembered to sprinkle them with extra salt, something I've been doing a lot lately, especially on cookies & brownies. It really complimented the sweetness of the butterscotch flavor and give it an added zing. Final verdict: husband approved :)

Butterscotch Pecan Cookies
Ingredients
1¾ c. all-purpose flour
1¼ c. brown sugar, packed
10 tbsp. (1¼ sticks) butter, room temperature
1 egg
1 tbsp. milk
2 tsp. vanilla extract
½ tsp. baking soda
½ tsp. salt + extra for sprinkling
¼ c. chopped pecans
⅓ c. chopped butterscotch chips

DIRECTIONS:
1. Preheat oven to 375 degrees. Line two baking sheets with parchment paper, set aside.
2. In the bowl of a stand mixer, beat together butter and sugar until smooth and fluffy (about 1 minute). Add egg, milk and vanilla, mix until combined.
3. In a medium size mixing bowl, whisk together flour, baking soda, and salt. With mixing speed on low, slowly add flour mixture to butter mixture. Remove bowl from stand and fold in pecans and butterscotch bits. Place dough in refrigerator for 10 minutes.
4. Remove dough from refrigerator, roll into balls and place onto prepared baking sheets about 2 inches apart. Sprinkle lightly with extra salt.
5. Place in oven and bake until lightly browned, 10 to 12 minutes (note: these are flat cookies, they will spread out). Remove and let cool on baking sheet for 3-4 minutes, then transfer cookies to a wire rack to cool completely.
Adapted from Martha Stewart, Schrafft's Butterscotch Cookies | Makes approximately 18-20 cookies

Flourless Mississippi Mud Brownies

1

Tuesday, August 7, 2012

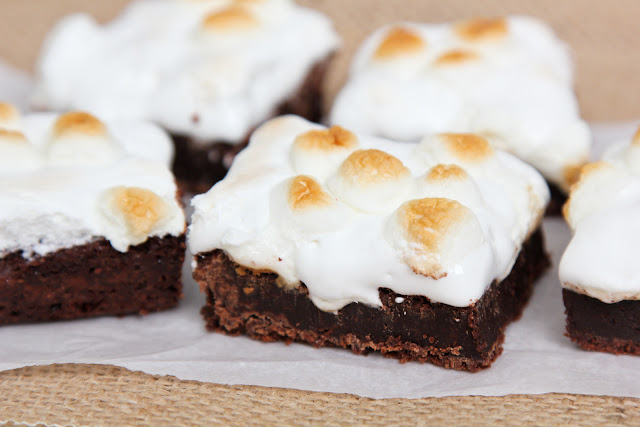
I mentioned in the previous post that I was able to meet up with my room mates from freshman year (and their husbands/kids). We all brought food to eat and share. Since one of the husbands has a gluten allergy, I made something he could enjoy along with the rest of us. I found this recipe via one of my favorite sites, Punchfork, by filtering the recipes for gluten-free only. When I scrolled down and saw a brownie recipe I immediately bookmarked it. I've been a huge fan of David Lebovitz and would try any and all of his recipes. Since I had never made anything that had to be 100% GF, I wanted to make sure I did it right. I added a few ingredients (after carefully checking to make sure they were safe) and turned ordinary brownies into Mississippi mud brownies. Why? Well, Stephen asked me a few weeks ago to make them and I thought this would be the perfect opportunity, after all, Kraft marshmallows are GF too! If you're scared about the whole no flour thing, don't worry, they don't need it. I was pleasantly surprised by both their texture and taste... and with that ooey gooey topping, you can't go wrong! Happy gluten-free baking!

Flourless Mississippi Mud Brownies
Ingredients
6 tbsp. butter
1 c. (8 oz.) bittersweet or semisweet chocolate, chopped
¾ c. sugar
2 eggs
1 tbsp. unsweetened cocoa powder (natural or Dutch process)
3 tbsp. corn starch
¼ tsp. vanilla
pinch of salt
¼ c. mini chocolate chips
½ (7 oz.) jar Kraft marshmallow fluff
1 c. mini Kraft marshmallows

DIRECTIONS:
1. Preheat oven to 350 degrees. Line an 8x8" baking pan with foil, leaving about 1" of overhang (so you can easily pull the brownies out). Lightly grease the foil with butter or non-stick cooking spray. Set aside.
2. In a double broiler, melt the butter and chocolate over low heat, stirring constantly until smooth.
3. Remove from heat and stir in the salt and sugar. Add eggs one at a time, mixing after each addition. Add vanilla and mix until incorporated.
4. In a medium size mixing bowl, whisk together the cocoa powder and corn starch. Slowly add these dry ingredients into the chocolate mixture. Beat the batter vigorously for 1-2 minutes, until the batter is no longer grainy and nearly smooth (it will pull away from the sides of the bowl).
5. Fold in the chocolate chips. Pour batter into the prepared pan.
6. Bake for 26 minutes, remove from oven and top with marshmallow cream. Sprinkle mini marshmallows on top and bake for an additional 3-4 minutes or until the marshmallows begin to puff. Do not overbake. Remove from oven place pan on a wire rack. Cool completely (45 minutes) before cutting and serving.
Adapted from Ready for Dessert by David Lebovitz, Gluten-free Brownies | Gluten Free | Makes approximately 9-12 brownies

Almond Joy Macaroons

1

Friday, August 3, 2012

Yesterday I was craving something sweet but didn't wan't to spend a whole lot of time in the kitchen. Since we're moving in a day or two I haven't gone to the store and we've been trying to use up what we have so we don't have to pack so much. With no flour, no butter, very little sugar and about a ⅓ of a bag full of chocolate chips, my options were pretty limited. That's when I thought of these tasty little treats. Ever since I tried one in Rhode Island, I've been wanting to make some. All I can say is that they were perfect- easy to throw together and only required a few ingredients (you can always buy coating chocolate and heat that up instead of tempering chocolate). If your sweet tooth is aching and you love chocolate/coconut, this is the perfect recipe for you!

Almond Joy Macaroons
Ingredients
2 c. (8 oz) sweetened flaked coconut
½ c. sugar
2 egg whites
¼ tsp. vanilla extract
¼ tsp. almond extract
pinch of salt

½ c. chocolate (semi-sweet or dark)
2 tbsp. slivered almonds

DIRECTIONS:
1. Preheat oven to 350 degrees. Line one baking sheet with parchment paper.
2. In a medium size mixing bowl, combine coconut, sugar, salt and vanilla. Add egg whites and mix until combined.
3. Using a small cookie scoop, place onto baking sheet 1½ inches apart. Lightly pat down with hands.
4. Place in oven and bake for 10-15 minutes, or until lightly golden brown. Remove from oven and let cool on sheet for 2-3 minutes. Transfer to a wire rack to cool completely.
5. Meanwhile, in a double broiler, over low heat, melt chocolate until it reaches 115 degrees. Remove from heat. Dip cooled macaroons into the chocolate, sprinkle with almond slices. Return to parchment paper. Place in refrigerator for 10-15 minutes until chocolate has hardened. Remove and serve.
Stephen + Natalie | Gluten Free | Makes approximately 12 macaroons

White Chocolate Caramel Macadamia Bars

2

Thursday, August 2, 2012

I made these a couple of days ago for Stephen's coworkers and they were a huge hit! I was inspired by The Cheesecake Factory's White Chocolate Caramel Macadamia Cheesecake... have you ever had it? If you have, you know how amazing it is, if not, you should definitely find a Cheesecake Factory near you and grab a slice! Since we live far away from one and Stephen loves it so much, I thought it would be really easy to adapt to a blondie bar. I searched a couple of my local grocery stores for caramel bits (I think Kraft makes them) but had no such luck. Instead I cut up those pre-wrapped chewy caramels and tossed them in. Once they got hot they melted and disappeared into the bars, it was like a little magic show in my oven. When I took them out they smelled incredible! I think next time I make a batch of these I'm going to toss in some coconut to add one more layer of flavor. Enjoy!

White Chocolate Caramel Macadamia Bars
Ingredients
1½ c. all-purpose flour
12 tbsp. (1½ sticks) unsalted butter, melted and cooled
1½ c. light brown sugar, packed
2 eggs
1 tsp. baking powder
½ tsp. salt + a extra pinch to sprinkle on top
1½ tsp. vanilla extract
¼ c. macadamia nuts, chopped
¼ c. caramel pieces (about 12-14 caramels, chopped)
¼ c. white chocolate chunks or chips

DIRECTIONS:
1. Preheat oven to 350 degrees. Line a 9x13 inch baking pan with foil or parchment paper, leaving at least a 2" overhang (this makes pulling them out cleaner and easier).
2. In a medium size mixing bowl, whisk together flour, baking powder and ½ tsp. salt. Set aside.
3. In the bowl of a stand mixer, beat together melted butter and brown sugar for 30 seconds. Turn speed to low and add one egg at a time. Add vanilla and mix until combined.
4. Remove bowl from stand mixer. Fold in dry ingredients. Do not overmix. Gently fold in chocolate chunks, nuts and caramel pieces. Pour into prepared pan. Sprinkle remaining salt over top.
5. Place in oven and bake for 22-24 minutes, or until the top is shiny and cracked and firm to the touch. Remove from oven and place pan on a wire rack to cool completely (30 minutes). Remove bars from pan using the overhanging edges of parchment or foil. Cut into bars.
Adapted from America's Test Kitchen- Blondies | Makes approximately 12 large bars or 24 small bars

Blog Redesign: A Quaint Life

1

Wednesday, August 1, 2012

These past few weeks I've been working on a design for a private family blog. It's taken me some time to get it up and running but I think it hits the mark: simple, clean and updated. Lizzy contacted me about a month ago and we've been emailing each other back and forth ever since. She wanted a dusty blue background, yellow or green accents and the sidebar to be adjusted. I had a few issues getting the CSS to work and eliminating the old template, but I think things look really good and she seems to be really pleased. Now on to the next one...

Life Made Simple All rights reserved © Blog Milk - Powered by Blogger