Homemade Caramel Corn

0

Wednesday, October 31, 2012

HAPPHALLOWEEN!

Growing up my grandma would always make huge batches of my aunt's caramel corn. She'd give bags of it to all of her grandchildren... we loved it! I'm a sucker for sweet and salty so when Stephen and I were looking for something to snack on, I knew exactly what to make! This caramel corn is really easy, can be made in advance, and the results are always amazing (trust me, I've eaten my fair share of it over the years). However, this was my first time making it, so I was extra careful to not burn the "caramel" and to stir frequently while it was in the oven. It came out looking good and tasting right, so I guess that proves it is foolproof after all ;). I did toss in some roasted peanuts (which makes it more of a cracker jack), some sea salt, and added vanilla bean paste just to give it a little more flavor, which it did. Mmmm! I'll warn you now, this stuff is addictive, it's like cracker jack crack! We're going to be sitting on the couch eating a giant bowl of this waiting on trick-or-treaters. Have a happy and safe Halloween!

Homemade Caramel Corn
Ingredients
½ c. unpopped pop corn
2 tbsp. canola oil

1 c. brown sugar, packed
¼ c. light corn syrup
2 tsp. molasses
½ c. butter
¼ tsp. baking soda
½ tsp. sea salt
½ tsp. vanilla bean paste (or extract)

Optional:
1 c. roasted peanuts

DIRECTIONS:
1. Preheat oven to 250 degrees. Generously spray or butter one rimmed baking sheet, set aside.
2. In a cold large dutch oven or stock pot with a lid, add oil and pop corn kernels. Coat kernels with oil and turn on heat to medium. Once the first kernel pops (around 2-3 minutes after turning the heat on), place the lid on. Once the kernels have popped and you only hear one every few seconds, remove the pot from the heat. Pour the popcorn into a large mixing bowl (you want extra room to stir).
3. In a small saucepan over medium heat, whisk together the brown sugar, corn syrup, molasses, butter and salt. Bring to a simmer (or a slow boil), stirring often. You'll know the mixture is ready when it reads 250 degrees on a candy thermometer (it will take 5 to 6 minutes).
4. Remove from heat, whisk in the vanilla and baking soda. Pour the mixture over the popcorn and gently mix until all of the popcorn is coated (stir in peanuts if desired). Pour the coated popcorn onto the prepared baking sheet, spreading it out evenly.
5. Place in oven and bake for 1 hour, stirring every 20 minutes. Remove from oven, let pan cool on a wire rack for 25 minutes. When caramel corn has cooled, break up into chunks. Serve or store for up to one week.
Adapted from a Stephen + Natalie family recipe | Makes approximately 12 servings

Halloween Goodie Box

0

Tuesday, October 30, 2012

In preparation for tomorrow, Stephen and I bought a huge bag of Halloween candy. I'm not sure how many trick-or-treaters we'll get since we live at the end of a street that no one knows exists, but we're prepared! Anyway, I don't have a festive bowl or spooky cauldron to put it in, so I decided to make a few of these boxes. Yes, I realize it's totally impractical to make these for trick-or-treaters, especially for those of you that get hundreds of them, but they'd be super cute for your kids or to give them to friends and family. All you need to do is print, cut, fold and tape and voila you've got a handy little goodie box!

Halloween Mason Jar Mini Cakes

5

Monday, October 29, 2012

A couple of weeks ago I was asked by Kristyn of Lil' Luna to be her newest contributor... I'm so excited and honored! Last week was my first post and I came up with this kid-friendly project. It's super easy and combines both baking and crafting. Ready to get started?! First off, you're going to need a few supplies. You'll have to decide whether you want to do all of one kind of jar, or if you want to do three of each (one box of cake mix makes (9) 1/2 pint mason jar mini cakes). Since I wanted to show you all of them, here's what you'll need to make three of each-

SUPPLIES:
Frankenstein: (3) 1/2 pint mason jars, 1 black Sharpie paint pen, 6 googly eyes, super glue, black sprinkles, green & black food coloring
Jack-O-Lantern: (3) 1/2 pint mason jars, 1 black Sharpie paint pen, green sprinkles, green and orange food coloring
Mummy: (3) 1/2 pint mason jars, 1 box of 2" gauze, 6 googly eyes, super glue, white sprinkles

1 Box white cake mix*

1 Recipe buttercream frosting
4 c. powdered sugar
1 1/2 c. (3 sticks) butter, room temperature
2 tbsp. heavy cream
1 tbsp. vanilla extract
1/4 tsp. salt

3 Piping bags with desired tips
DIRECTIONS:
1. Now that we've decided what we're making, lets get the cake batter made! *You can always use your own recipe, but a store bought mix is a quick and easy alternative. Once the batter is ready divide it evenly in between three bowls. Add a few drops of food coloring into two of the bowls, coloring one green and the other orange. Pour the batter into the mason jars, filling each to the halfway mark (don't go any further, or your cakes will overflow). You will end up with three green, three orange and three white.
2. Set the jars onto a rimmed baking sheet and place in the center of the oven. Bake at 350 degrees for 20 minutes. BE CAREFUL! If you over-bake these they will become brown... so watch them up until the 20 minute mark and remove them immediately!
3. Place the baked cakes onto a wire rack to cool completely (about 30-40 minutes). If the cakes have risen too much, you can always take a knife and cut off the excess cake so that there is enough room to frost them.
4. Meanwhile to prepare the frosting, in the bowl of a stand mixer, beat together butter, vanilla, heavy cream and salt. With mixing speed on low, gradually add powdered sugar. Turn the speed up to high and beat until fluffy, about 5 minutes. Remove bowl from stand and divide frosting into three bowls. Color one orange, one black and leave the other white. Scoop into prepared piping bags. Set aside.
5. When cakes have cooled, decorate jars. Let the ink and glue set for 5-10 minutes before frosting.
6. Frost the cakes as desired and garnish with sprinkles. If you are giving these as a gift, you can screw on lids and decorate the tops. To store, seal and place in refrigerator for 2-3 days. Enjoy!
You can see my original post + more pictures HERE at Lil' Luna!

Apple Pie Cupcakes

6

Friday, October 26, 2012

 
This recipe is brought to you by yet another Willow Bird Baking challenge! This time we had to come up with a stuffed and frosted cupcake. Since it's fall and the husband and I both love pie but baking an entire one is just too much for us, I thought I'd make a cupcake version of an apple pie! Perfect, right?! I started off by using a cinnamon spiced cake, filling it with soft apples and topping it with some vanilla ice cream frosting and a crust crisp. These cupcakes are absolutely to die for! I don't know why I didn't think of this sooner. I love love love the snickerdoodle cupcakes I made a while back, and these are just a new and improved version of them! If you're curious about the vanilla ice cream frosting, I just melted a little bit of our favorite french vanilla bean ice cream and used it in place of heavy cream or milk. It adds a little something extra to it! Enjoy!

Apple Pie Cupcakes
Ingredients
¾ c. all-purpose flour
¾ c. cake flour
¾ c. + 2 tbsp. sugar
½ c. (1 stick) butter, room temperature
⅔ c. whole milk
2 eggs
1½ tsp. baking powder
¼ tsp. salt
1¼ tsp. cinnamon
¼ tsp. allspice
1¼ tsp. vanilla extract

For the filling:
2 apples, peeled and diced
1 tbsp. brown sugar
1 tbsp. butter
¼ tsp. lemon juice
¼ tsp. cinnamon

For the vanilla ice cream frosting:
3 c. powdered sugar
½ c. (1½ sticks) butter, room temperature
¼ c. vanilla ice cream, melted (just let it sit at room temperature)
½ of a vanilla bean, scraped (or ½ tsp. vanilla bean paste)
pinch of salt

For the pie crisps:
Packaged pastry crust (not puff pastry), thawed
Turbinado sugar

DIRECTIONS:
1. Preheat the oven to 350° F.
2. Combine flours, baking powder, salt, allspice, and cinnamon in a medium bowl and whisk to combine.
3. In the bowl of a stand mixer, beat the butter and sugar on medium-high speed until light and fluffy, about 3 minutes. Beat in the eggs one at a time, mixing well after each addition. Blend in the vanilla.
4. With the mixer on low speed, add in the dry ingredients in three additions alternating with the milk, beginning and ending with the dry ingredients. Beat each addition just until incorporated.
5. Divide the batter evenly between the prepared cupcake liners, filling each three-quarters full. Bake, rotating the pans halfway through, until a toothpick inserted in the center comes out clean, about 16-18 minutes (do not over-bake or your cupcakes will be dry). Remove from oven and place tin on a wire rack. Allow to cool in tin for 5 minutes before transferring cupcakes to the wire rack.
6. Cut out circles from pastry, place on a parchment lined baking sheet. Sprinkle with turbinado sugar and bake for 8-12 minutes or until golden brown in color. Remove from oven and let cool on sheet.
7. Meanwhile, combine all filling ingredients into a medium saucepan over low heat. Cook apples until soft, about 6-8 minutes. Remove from heat and allow to cool.
8. To prepare buttercream, in the bowl of a stand mixer fitted with the whisk attachment, beat together butter, vanilla, ice cream, and salt until smooth. With mixing speed on low, gradually add powdered sugar. Once the all of the powdered sugar has been added, turn the speed up to high and beat for 4-5 minutes until fluffy.
9. To assemble, using a cupcake corer or a knife, remove a chunk from the center of each cupcake- enough to put a generous amount of filling in there. Fill cupcakes with cooled apple mixture, then using a large ice cream scoop, place a scoop of frosting on top. Garnish with a pie crisp.
Adapted from Recipe Girl, Snickerdoodle Cupcakes | Makes 12 cupcakes

Halloween Bunting Banner

3

Thursday, October 25, 2012

Where has fall gone? The other day we went to a RSL game and it started snowing! I was surprised that it had gotten so cold so fast! I'm not going to lie, we're kind of excited for snow! Stephen will get to ski and I will enjoy turning on the fireplace and sipping hot cocoa while it comes down outside! It seems so much nicer when you don't have to walk to school or classes in it! Anyway, I'm really looking forward to our fireplace (we've never had one before), not only because it's going to heat part of our home, but because we get to decorate the mantel for holidays! I'm such a girl, I know. Right now it's adorned with pumpkins and pictures, but I thought it needed something more... like a banner. That's when I came up with this printable. I made several copies of it so that it would reach across the length of the fireplace, I cut/hole punched them and then strung them up with some really cute twine. I love the touch it adds, and I hope you will too!

Salted Caramel Brownie Bites

2

Wednesday, October 24, 2012

 
A couple of weeks ago when my mother-in-law was in town we headed down to Provo and stopped by the BYU Bookstore. Ahh... so many memories there (it was where I worked while in college). Anyway, we had to hit the candy counter. Yes, had to. They've got chocolate covered cinnamon bears, decadent fudge, and the most amazing little salted caramel chocolates. We ate a few and I saved the rest, hoping that they'd last us through the following few weeks (we tend to eat any and all chocolate in sight, don't judge). I knew if I didn't take drastic measures they'd be gone, so I tucked them away in our pantry. The other day I found them. I was just about to make some brownies when it hit me: PUT THEM IN THE BROWNIES! Yes... mini brownies, that way the chocolate to caramel ratio would be perrrfect. Oh and by topping them with a few mini chocolate chips and a pinch of sea salt they'd be even more perfect! Turns out they were. Stephen ate three or four within 10 minutes. They were gone by the end of the night. No worries, Stephen's brother was over to help out too... we're not that bad, geesh ;)

Salted Caramel Brownie Bites
Ingredients
¼ c. all-purpose flour
1½ tsp. cocoa powder
2 oz. dark or semi-sweet chocolate (I use a half of a Ghiradelli baking bar)
⅓ c. sugar
3 tbsp. butter
1 egg
¹⁄₈ tsp. salt
½ tsp. vanilla
12 salted caramel chocolates
3 tbsp. mini chocolate chips + extra to sprinkle on top
Pinch of sea salt for garnish

DIRECTIONS:
1. Preheat oven to 350 degrees. Spray a mini cupcake/muffin tin with baking spray, set aside.
2. Over a double broiler, melt butter, sugar and chocolate. Whisk until smooth. Let mixture cool on counter for 5 minutes. Pour into the bowl of a stand mixer. Add vanilla and egg, mix until incorporated.
3. In a small mixing bowl whisk together flour, cocoa powder and salt. With mixing speed on low, gradually add the dry ingredients. Mix until just combined. Remove bowl from stand and fold in chocolate chips.
4. Scoop a small amount of batter into the bottom of each well, just enough to cover the base. Place a salted caramel into the center, then cover with remaining batter until each is ¾ of the way full. Sprinkle with mini chocolate chips. Place in oven and bake for 9-11 minutes, being careful not to burn the brownies (the edges should be set). 
5. Remove from oven and sprinkle with sea salt. Let cool in pan for 3-4 minutes, then transfer to a wire rack to cool completely (about 20 minutes).
NOTE: There are no leaveners in the brownie recipe... they turn out just fine :)
Adapted from Ready For Dessert, Brownies | Makes approximately 12 mini brownie bites

Halloween Cupcake Toppers

1

Tuesday, October 23, 2012

One of my favorite things about Halloween is buying/making festive goodies! I've seen so many cute things at work (which all happen to be on sale now), including this adorable cake stand. I want them all, ALL I say! I'm just kidding, I may or may not have picked up a few things in the past couple of weeks, but I'll resist hoarding the holiday decor and baking supplies till Christmas. In the meantime I've made a few printables to top some spooky cupcakes or brownies. They'll look great with anything black, white, orange, green or purple. They're clean and simple.

He's 28 + a Cookie Cake!

7

Monday, October 22, 2012

Happy Birthday Stephen!!! 
One of Stephen's favorite birthday treats (besides an ice cream cake) is a giant cookie cake- especially the ones that you can get at a Great American Cookies. They come frosted around the edges and personalized in the center. Well, if you saw my post about the double doozies, you know that we live nowhere near one of those stores. So again, I decided to make my own version. I recently used my gift certificate from Karen's Cookies to purchase a giant cookie cake pan... knowing that one day I'd use it for this very purpose. When I looked at the insert inside of the pan I realized that there was a recipe for it. I went online, read some reviews, and decided to make a few adjustments in hopes of creating a more flavorful and moist cookie. I also needed to frost it which meant whipping up a batch of our favorite buttercream frosting. I carefully piped it around the edges, added some candles to the center, and voilà, the perfect birthday cookie cake! I know he's going to love it and I think it will taste just as good as the store bought kind! I can't wait until he gets home and I get off work so we can celebrate!

M&M Chocolate Chip Cookie Cake
Ingredients
1½ c. all-purpose flour
½ c. sugar
¼ c. brown sugar, packed
½ c. (1 stick) butter, room temperature
1 egg + 1 egg yolk
¼ tsp. baking soda
¼ tsp. salt
1 tsp. vanilla extract
¼ c. chocolate chips
½ c. M&Ms

For the frosting:
2¼ c. powdered sugar
¾ c. (1½ sticks) butter, room temperature
1 tbsp. heavy cream
1½ tsp. vanilla extract
pinch of salt

DIRECTIONS:
1. Preheat oven to 350 degrees. Line the bottom of a giant round cookie pan with a circle of parchment paper. Lightly spray edges of pan with baking spray, set aside.
2. In the bowl of a stand mixer, beat together butter and sugars until fluffy, about 2-3 minutes. Add vanilla and one egg, mix, then add the egg yolk and mix until combined.
3. In a medium size mixing bowl, whisk together flour, baking soda, and salt. With mixing speed on low, gradually add to wet ingredients. Mix until just combined.
4. Remove bowl from stand and fold in chocolate chips and M&Ms. Pour batter into prepared pan. Smooth out and sprinkle a few M&M's on top. Place in oven and bake for 16-22 minutes or until the top turns golden brown in color. Remove and place pan on cooling rack. Allow to cool for 45 minutes before removing from pan and frosting.
5. Meanwhile, to prepare the frosting, in the bowl of a stand mixer, beat together butter, vanilla, heavy cream and salt. With mixing speed on low, gradually add powdered sugar. Turn the speed up to high and beat until fluffy, about 5 minutes. Tint with food coloring if desired.
6. Pipe frosting around the edges of the cake using a large decorating tip. If desired, using a smaller decorating tip, pipe lettering in the center of the cake.
NOTE: You can use any 9x13 cookie bar or brownie recipe in this pan, just remember to adjust the baking time accordingly!
Adapted from Wilton, Chocolate Chip Cookie | Makes (1) 11" cookie cake, serves approximately 8-10

P.S. Don't forget to check out my guest post over at Lil' Luna!
You won't want to miss it!

Biscoff Stuffed Snickerdoodles

8

Friday, October 19, 2012

As some of you have probably noticed, my latest obsession is Biscoff spread. I absolutely love baking with it! So when Julie announced that the next Willow Bird Baking challenge was all about stuffed cookies, I knew exactly what to make (thanks to my mom who had just recently made snickerdoodles, both Stephen and I were craving them). I adapted a snickerdoodle recipe from Julie's blog and filled them with a Biscoff cream cheese mixture. I rolled them in cinnamon sugar, placed them on a baking sheet and tossed them in the oven. After about 10 minutes of baking the kitchen smelled heavenly... oddly enough a bit like apple pie (hmm... maybe for next time?). Just after they had cooled I cut into one, took a bite and realized that this may just be my new favorite thing. These snickerdoodles went from ordinary to extraordinary with just a little scoop of Biscoffy goodness. Two more? Yes please!

Biscoff Stuffed Snickerdoodles 
Ingredients
2 c. all-purpose flour
½ c. sugar
½ c. powdered sugar
2 tbsp. whole milk
½ c. oil
½ c. (1 stick) butter, room temperature
1 egg
½ tsp. baking soda
½ tsp. cream of tartar
¼ tsp. salt
¼ tsp. vanilla extract

For rolling:
¼ c. sugar + 1½ tbsp. cinnamon

For filling:
1 tbsp. powdered sugar
2 oz. original cream cheese
¼ c. chunky Biscoff spread
2 tbsp. Biscoff cookies, ground into fine crumbs
½ tsp. cinnamon

DIRECTIONS:
1. Preheat oven to 350 degrees. Line 2 baking sheets with parchment paper, set aside.
2. In the bowl of a stand mixer, combine butter, oil, milk, and sugars. Beat until smooth and creamy.
3. Add egg and vanilla extract, mix until just combined.
4. In a medium size mixing bowl, combine flour, baking soda, cream of tartar and salt. Whisk to combine. With mixing speed on low, gradually add mixture to the wet ingredients. Mix until just combined. Remove bowl from stand and chill dough while preparing the remaining parts.
5. In a small mixing bowl, combine all filling ingredients. Using a rubber spatula, mix until all ingredients are incorporated. Place in refrigerator to chill for 15 minutes.
6. In a small bowl, combine cinnamon and sugar. Whisk to combine, set aside.
7. When dough and filling are sufficiently chilled, remove from refrigerator. Using a standard size cookie scoop, form balls of dough. Break each ball in half and pat to make a flat circle. Place a quarter size ball of dough on one flat circle, then top with plain flat circle. Press the edges and form a ball in the palm of your hands. Roll into cinnamon sugar mixture and place on a prepared baking sheet (you should get 12 to a sheet). Continue the process until the remaining dough/filling has been used.
8. Place in oven and bake for 12-14 minutes (these cookies will not brown, they will just get crispy so don't over bake them). Remove from oven and allow to cool on sheets for 3 minutes. Transfer to a wire rack to cool completely.
Adapted from Willow Bird Baking, Gingersnap Cheesecake Stuffed Snickerdoodles | Makes approximately 20 stuffed cookies

Fall break according to instagram

1

Thursday, October 18, 2012

Last week was Stephen's fall break, which meant we got to sleep in, hang out and explore the valley a little more. Oh, and did I mention that his mom came out to visit us?! We got to show her around and take her to a few of our favorite places. Here are a few snapshots of what we've been up to lately:
Making raspberry clafoutis- which was surprisingly easy and super delicious // Hiking in the canyons
Watching Mandy on KSL (aka Baking With Blondie) // Nearly freezing up at Lake Catherine
Discovering the damage that the beavers have made up at Silver Lake // Buying paella supplies from work
Shopping with Jo & finding awesome cougar beanies- go BYU! // Taking glamour shots of Stephen ;)
Riding the ferris wheel at Scheels and freaking out at the top // Watching Jo and Adam go up
Posing in all of the photo booths at Scheels // Yep, another one- did you think we flew back to Florida? :)
Taking pictures with Honest Abe, or just a nice statue of him // Walking around Silver Lake with Jo & Adam
Enjoying nature and getting out before it gets too cold and the snow starts to fall.

Pink Week // Raspberry Vanilla Bean Cupcakes

3

Wednesday, October 17, 2012

Last week Ashton from Something Swanky was hosting a Pink Week in honor of Breast Cancer Awareness Month. She asked me to share something with her readers so I baked up a batch of these cupcakes topped with raspberry buttercream. The vanilla cupcake base is moist and delicate and perfectly compliments the slightly tart filling. The light and fluffy buttercream is sweet with just the right amount of raspberry flavor- it is definitely the perfect icing for these little cakes!

If you would like to support a great cause and help promote awareness there are so many ways to do so, like purchasing some of these amazing KitchenAid products, joining a walk or race, or simply donating to the cause. 

Raspberry Filled Vanilla Bean Cupcakes with Raspberry Buttercream
Ingredients
½ c. all-purpose flour
1¼ c. cake flour
½ c. unsalted butter, room temperature
⅔ c. whole milk
⅓ c. sour cream
1 c. granulated sugar
2 eggs
1½ tsp. baking powder
½ tsp. baking soda
½ tsp. salt
1 vanilla bean, scraped
1 tbsp. + ½ tsp. vanilla extract

Raspberry filling:
1½ c. seedless raspberry puree
¼ c. sugar
1 tbsp. cornstarch
1 tsp. lemon juice
1 tsp. lemon zest

Raspberry buttercream: 
16 tbsp. (2 sticks) unsalted butter, room temperature
1 tbsp. heavy whipping cream
¼ c. seedless raspberry puree
1½ tsp. vanilla extract
3 - 3½ c. powdered sugar
1 tbsp. cornstarch
¼ tsp. salt
Optional: pink food coloring

DIRECTIONS:
1. Preheat oven to 350 degrees. Line 2 cupcake tins with 16 liners, set aside.
2. In a medium size mixing bowl whisk together flours, baking powder, baking soda, and salt. Set aside.
3. In the bowl of a stand mixer, add sugar, butter, sour cream, vanilla extract and vanilla bean. Mix for 1 minute.
4. Add one egg at a time, mixing after each addition. With mixing speed on low, alternate between adding the dry ingredients and the milk. Beat until just combined.
5. Divide batter and fill cupcake liners ⅔ of the way full.
6. Bake for 15-18 minutes, or until a cake tester inserted into the center comes out clean (note: they will not turn golden brown, so do not over bake).
7. Remove from oven and let cupcakes cool in tins for 5 minutes, transfer to a wire rack to cool completely.
8. While cupcakes are cooling, puree raspberries. Combine 1½ c. seedless raspberry puree in a saucepan (over medium low heat) with sugar, lemon juice, and zest. Sprinkle in corn starch. Allow mixture to reduce, whisking frequently (it should be relatively thick, almost curd-like (give it 5 minutes or so). Remove from heat and set aside to cool. Using a cupcake corer, remove center of cupcakes. Pipe or scoop the raspberry filling inside. Place tops back on cupcakes.
9. To make the raspberry buttercream, place ¼ c. seedless raspberry puree into the bowl of a stand mixer. Add butter, vanilla and salt. Beat until smooth. With mixing speed on low, add powdered sugar and cornstarch, then heavy whipping cream. Beat until soft peaks begin to form or until the buttercream becomes fluffy (2-3 minutes). Chill in refrigerator for 10-15 minutes before piping onto cupcakes.
NOTE: The cornstarch will help create a stiff frosting, this is helpful when adding fruit purees.
Stephen + Natalie | Makes approximately 16 cupcakes

This was originally a guest post over at Something Swanky

Chocolate Pumpkin Whoopie Pies

12

Monday, October 15, 2012

I have a confession for you all... I've never made a whoopie pie, well, until a few days ago. I'm not sure how I've made it through all of these "culinary" adventures without doing so. I have however, helped my mom make her famous mint "sandwich cookies," which people mistakingly call whoopies, but for me, a whoppie pie is cake-like with a soft frosted center. So lets count those mint ones out, deal? Well, like I said, I finally decided it was time to try my hand at making some. I love the idea of pumpkin and chocolate together, so I decided on these little pies. Yes they're a bit funky looking, not exactly smooth and flawless like most traditional whoopies, but they definitely make up for that in taste! They're soft and sweet and full of that pumpkin flavor that we all love so much... oh, and did I mention that there are mini chocolate chips in there too? Yep... they're kind of perfect :) Enjoy!

Chocolate Pumpkin Whoopie Pies
Ingredients:
2 c. all-purpose flour
¾ c. unsweetened cocoa powder
1¼ c. sugar
8 tbsp. (1 stick) butter, room temperature
1 c. buttermilk, room temperature
1 egg
1½ tsp. baking soda
½ tsp. baking powder
¹⁄₈ tsp. salt
1 tsp. vanilla

Pumpkin Chocolate Chip Filling:
¾ c. powdered sugar
4 oz. cream cheese, room temperature
4 tbsp. (½ stick) butter, room temperature
¼ c. pumpkin puree
¼ tsp. pumpkin pie spice
¹⁄₈ tsp. salt
¼ tsp. vanilla
¼ c. mini semi-sweet chocolate chips

DIRECTIONS:
1. Preheat oven to 400 degrees. Line 2 baking sheets with parchment paper, set aside.
2. In the bowl of a stand mixer, beat together butter and sugar until light and fluffy (2-3 minutes). Add the egg, buttermilk and vanilla, mix until incorporated.
3. In a medium size bowl, whisk together flour, cocoa powder, baking soda, baking powder and salt. With mixing speed on low, gradually add the dry ingredients. Mix until just combined (the dough will look more like a batter- remember these are cake-like).
4. Remove bowl from stand place in refrigerator for 15 minutes. Once the dough has chilled, scoop 12 balls of dough (about the size of 2 tbsp.) onto the prepared cookie sheets. Place in oven and bake until the edges begin to set (approximately 8-9 minutes), be careful not to overbake. Remove from oven and let cool on sheets for 5 minutes before transferring to a wire rack to cool completely. Repeat the process with the remaining dough.
5. While the cookies are cooling, to prepare the filling, in the bowl of a stand mixer fitted with the whisk attachment, beat together cream cheese, butter and pumpkin. Add in pumpkin pie spice, salt and vanilla. With mixing speed on low, gradually add powdered sugar. Beat for 2-3 minutes until light and fluffy. Fold in mini chocolate chips (or roll edges in once they have been frosted).
6. Pipe filling onto the flat side of one cookie, then sandwhich. Continue until all of the cookies have been piped and sandwiched.
Adapted from Food Network Magazine, Whoopie Pumpkin Pies | Makes approximately 12 whoopie pies

Pumpkin Muffins with Cinnamon Cream Cheese Filling

19

Friday, October 12, 2012


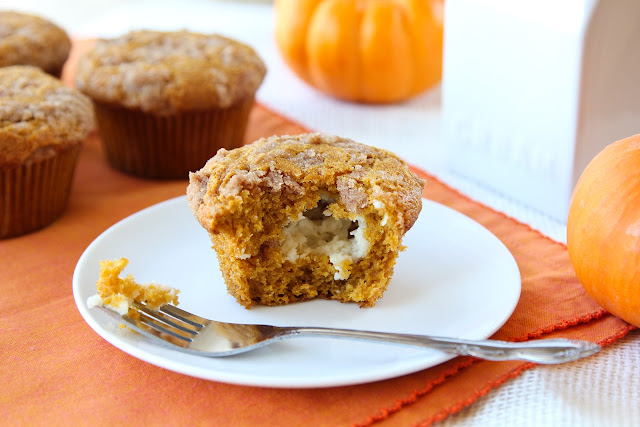
Since I have a thing for cheesecake and coffee cake, I thought combining the two in a pumpkin muffin would be pretty darn amazing. It just made sense to me, you know? I'm glad I did, because these babies are incredibly good! I love the idea of cream cheese in muffins, whether it be chocolate muffins, strawberry muffins or pumpkin muffins- it's really a great ingredient. Combine it with some cinnamon and vanilla... oh man, it melts together while baking and tastes like a bite of cheesecake once it cools! The topping on these is crunchy and sweet and gives these muffins a little extra something (or what I would call the coffee cake topping). These really are a little taste of heaven!

Pumpkin Muffins with Cinnamon Cream Cheese Filling
Ingredients
1½ c. flour
1½ c. sugar
½ c. brown sugar, packed
½ c. canola oil
2 eggs
1 c. pumpkin puree
1 tsp. baking powder
½ tsp. baking soda
½ tsp. salt
1 tsp. pumpkin pie spice
½ tsp. cinnamon
1 tsp. vanilla

For the filling:
4 oz. Original Philadelphia Cream Cheese
½ c. powdered sugar
¹⁄₈ tsp. vanilla
½ tsp. cinnamon

For the topping:
2½ tbsp. flour
2 tbsp. sugar
2 tbsp. brown sugar. packed
2 tbsp. butter, melted
pinch of salt
¾ tsp. cinnamon

DIRECTIONS:
1. Preheat oven to 350 degrees. Line 2 muffin tins with 16 cupcake liners. Set aside.
2. In a small mixing bowl, combine all ingredients for the filling. Mix together with a spatula until smooth. Refrigerate until needed.
3. To make the topping, combine all ingredients in a small bowl and mix until incorporated.
4. In the bowl of a stand mixer, beat sugars, oil and pumpkin puree until smooth. Add vanilla and one egg, mix. Add the second egg and mix until combined.
5. In a medium size mixing bowl, whisk together flour, salt, baking powder, baking soda, cinnamon and pumpkin pie spice. With mixing speed on low, gradually and to wet ingredients. Mix until smooth. 
6. Scoop batter into liners filling ¼ of the way full. Place a gum ball sized dollop of filling in each, then cover with remaining batter until each liner is filled ¾ of the way full. Sprinkle with chunks of topping. Place in oven and bake for 20-23 minutes or until the tops are golden brown. Remove from oven and place pans on a wire rack to cool for 5 minutes before removing muffins and letting them cool on the rack for 15 minutes.
Adapted from Gourmet Magazine, Pumpkin Muffins | Makes approximately 16 standard size muffins

Peanut Butter Swirl Brownies

4

Wednesday, October 10, 2012

Stephen is kind of obsessed with brownies. He especially loves it when I load them with huge chucks of chocolate. Me, not so much. I'd rather eat a cookie or a bowl of ice cream. But every once in a while I'll toss in a pan... and eat a few. So the other night when he asked me to make him peanut butter brownies I headed to the kitchen and went to work. I've had chocolate brownies with a peanut butter swirl several times, and somehow during the baking process the swirl always manages to melt and disappear- not cool. I want to taste the peanut butter, bite into it and know it's there! You know what I mean? That meant making a peanut butter batter, something that would hold up. I found a good recipe and adapted it to fit the brownie recipe that he really loves. The result: perfection. These brownies are not to be messed with. They were gobbled up within seconds... seriously!

Peanut Butter Swirl Brownies
Ingredients
½ c. all-purpose flour
1 tbsp. unsweetened cocoa powder
4 oz semi-sweet chocolate, melted (use a Ghiradelli baking bar!)
⅔ c. sugar
6 tbsp. (¾ stick) butter
2 eggs
¼ tsp. salt
1 tsp. vanilla
½ c. semi-sweet chocolate chips + 1/4 c. mini semi-sweet chocolate chips

For the peanut butter batter:
¼ c. flour
½ c. sugar
½ c. creamy peanut butter
4 tbsp. (½ stick) butter, room temperature
1 egg
¹⁄₈ tsp. baking powder
¼ tsp. salt
1 tsp. vanilla

DIRECTIONS:
1. Preheat oven to 350 degrees. Line an 8x8 baking pan with foil so that there is enough to pull the brownies out once they are done. Butter or spray lightly with baking spray. Set aside.
2. Over a double broiler, melt butter, sugar and chocolate. Whisk until smooth. Let mixture cool on counter for 5 minutes. Pour into the bowl of a stand mixer. Add vanilla and one egg, mix, then add the other egg, mix until incorporated.
3. In a small mixing bowl whisk together flour, cocoa powder and salt. With mixing speed on low, gradually add the dry ingredients. Mix until just combined. Remove bowl from stand and fold in chocolate chips. Set aside.
4. For the peanut butter batter, in a medium size mixing bowl, combine butter, peanut butter and sugar. Using a hand mixer, beat until fluffy and smooth. Add vanilla and egg, mix until incorporated. Sprinkle in baking powder and salt, gradually add flour while mixing.
5. To assemble, pour half of the brownie batter into the prepared pan. Dollop half of the peanut butter batter on top and swirl. Pour the remaining brownie batter on top, then dollop the remaining peanut butter batter, swirl (I folded over some of the brownie batter so there weren't huge chunks of peanut butter batter). Once the top is swirled, place in oven and bake for 35-38 minutes. The peanut butter batter should begin to brown on top.
6. Remove from oven and let cool in pan for 25 minutes. Remove using the foil overhang and place on a wire rack to cool completely (another 20 minutes or so). Remove foil from brownies, cut and serve.
NOTE: There are no leaveners in the brownie recipe... they turn out just fine :)
Adapted from Ready For Dessert, Brownies | Makes approximately 9 large brownies or 12 standard size brownies

Spiced Pumpkin Ice Cream

12

Monday, October 8, 2012

One of my favorite things about fall is using pumpkin in every way possible. I'm not sure how much Stephen likes pumpkin, but he's slowly getting used to the idea of having it on a weekly basis. At least he tries everything I make with it... and goes back for seconds :) Since we love to make homemade ice cream I thought this would be perfect for after dinner! It tastes like a frozen pumpkin pie- so delicious! It would be great with some gingersnap cookies crumbled on top or chopped toasted pecans. However you decide to serve it, I'm sure it will be a hit!

Spiced Pumpkin Ice Cream
Ingredients:
¼ c. sugar
½ c. brown sugar, packed
1 c. pumpkin puree
1 c. heavy cream
1½ c. whole milk
5 egg yolks
½ tsp. pumpkin pie spice
¼ tsp. ground cinnamon
¼ tsp. ground ginger
¹⁄₈ tsp. ground nutmeg
¼ tsp. salt
2 tsp. vanilla

DIRECTIONS:
1. In a medium saucepan over medium heat, combine milk, ½ c. of heavy cream and sugars. Bring mixture to a low simmer.
2 While mixture is heating over the stovetop, in a medium size mixing bowl, whisk egg yolks with pumpkin pie spice, cinnamon, ground ginger, nutmeg and salt. Slowly pour hot milk mixture into the eggs, whisking while doing so.
3. Return mixture to the stovetop and continue heating until the temperature coats the back of a rubber spatula or reaches 160 degrees on a thermometer.
4. Pour the mixture through a mesh sieve into a large mixing bowl. Add vanilla, salt, remaining ½ c. of heavy cream and pumpkin puree into the large mixing bowl. Whisk until smooth. Cover with plastic wrap and place into refrigerator to chill for 1 hour.
5. Once the mixture has chilled, pour mixture into an ice cream machine and chill according to manufacturer's instructions (20 minutes or so with the KitchenAid attachment). Transfer the churned ice cream into an air-tight freezer safe container and freeze for 3-4 hours before serving.
Adapted from Williams-Sonoma, Pumpkin Ice Cream | Makes approximately 6-8 servings

The Fall 2012 Giveaway winner is...

0

Andrea from Yesterday's Tomorrow!
CONGRATULATIONS!

Thanks again to everyone who entered :)

Raspberry Lemon Curd Rolls

7

Thursday, October 4, 2012

The other night I had a dream. Nothing visionary, just kind of odd. It was about cinnamon rolls. Don't get me wrong, there's nothing weird about dreaming of food, I do it all of the time... but I woke up craving them. Then that afternoon when I was browsing the blogosphere I stumbled across Willow Bird Baking. Julie had just announced her first baking challenge and lo and behold it was all about using her sweet roll recipe! I immediately started brainstorming ideas and eventually decided on these raspberry lemon curd rolls. Stephen and I have been loving all of the fresh berries we've been eating and since I had a couple of lemons sitting around it just seemed like the natural choice. In order to create a "filling" I decided on curd, something that would make them nice and gooey inside. You can either use a store-bought curd, or cook it over the stove-top, but I opted for the fast and easy method... I microwaved it! Add some sugar to the raspberries, cook them down and roll it all up into a nice log. All that's left to do is cut them up, bake them and slather them in some zesty cream cheese frosting. These sweet rolls are absolutely perfect in every way! Enjoy! Also thanks Julie for such a fun challenge, I'm already looking forward to the next one!

Raspberry Lemon Curd Rolls
Ingredients
(Click here for complete recipe for Willow Bird Baking's rolls)
5 c. all-purpose flour
1 package (2¼ tsp.) active dry yeast
3 tbsp. sugar
⅔ c. butter flavored shortening
2 c. milk minus 2 tbsp.
¼ c. warm water
2 tbsp. apple cider or white vinegar
1 tsp. salt
1 tsp. baking soda
1 tsp. baking powder

Lemon Curd Filling:
1 c. sugar
8 tbsp. (1 stick) butter, melted
2 eggs
1 c. freshly squeezed lemon juice
Zest of 2 lemons

Filling:
4 c. fresh raspberries

Lemon Cream Cheese Frosting:
2 c. powdered sugar
8 oz. cream cheese, softened
2 tbsp. milk
1 tsp. vanilla
½ tsp. lemon extract or oil
Zest of 1 lemon

Raspberry Drizzle:
½ c. sugar
Raspberry juice

DIRECTIONS:
1. In a small bowl, combine warm water and yeast. Whisk to combine and allow to sit for 10-15 minutes until the mixture becomes foamy.
2. Meanwhile, combine vinegar and milk in a 2 c. measuring cup. Allow to sit while preparing the remaining ingredients.
3. In the bowl of a stand mixer, combine flour, sugar, salt, baking soda and baking powder. Using a pastry blender, cut in shortening until it resembles coarse crumbs. Stir in yeast and milk mixture, using the pastry hook mix (knead) until a ball begins to form. Place ball of dough in a large lightly greased bowl. Cover tightly with plastic wrap and place in the refrigerator overnight.
4. To prepare lemon curd, combine all ingredients in a large microwave-safe bowl. Whisk until smooth. Place in microwave and heat on HIGH for (5) 1 minute increments, mixing in between each heating.
Let mixture cool on counter for 10 minutes. Transfer to an air-tight container and refrigerate overnight.
5. In the morning, place raspberries into a skillet. Over low heat, simmer with ¼ c. water and ½ c. sugar for 5-6 minutes. Remove raspberries and place in a small bowl. Continue heating the juices for 4-5 more minutes until it begins to thicken. Place drizzle into a bottle and set aside.
6. Remove dough from refrigerator and divide into two equal balls. Roll out one ball on a lightly floured surface. Spread ⅔ c. of lemon curd over the rectangular slab of dough. Place ½ of the raspberries on top. Roll up and cut into 12 rolls. Place in a lightly greased 9x13 baking dish. Repeat with the second ball of dough. Cover pans with a dish cloth and set in a draft-free area for 1½ hours or until rolls have doubled in size.
7. Preheat oven to 375 degrees. Place rolls into oven and bake for 20-25 minutes or until tops are golden brown in color. Remove rolls and place pan on a wire rack to cool for 15 minutes.
8. Meanwhile, to prepare the frosting, combine all ingredients in a medium size mixing bowl. Beat until smooth. Spread over warm rolls and drizzle with raspberry sauce. Serve immediately.
Sweet Roll Dough recipe from Willow Bird Baking | Makes 24 standard size rolls

Pumpkin Chocolate Chip Muffins

6

Wednesday, October 3, 2012

Last year I baked a few treats and took them to a fall activity at church. Just about every dessert was pumpkin, which wasn't something I was going to complain about, I love pumpkin! It was there that I tried a pumpkin chocolate chip muffin for the first-time-ever. For some reason the thought of those two ingredients together was frightening to me. I just couldn't imagine pumpkin and chocolate in the same bite. So I put one on my plate and went back to the table. I ate it. I liked it. No, I loved it! I suddenly found myself going back for seconds. Who knew? What a lovely combination it turned out to be. So this is me, a year later, finally making myself a batch of those incredibly delectable muffins. They're sweet and "spicy" and studded with chocolate chips both big and small. After baking some of these your house will smell amazing and your family (along with your stomach) will thank you- trust me.

Pumpkin Chocolate Chip Muffins
Ingredients
1½ c. flour
1½ c. sugar
½ c. brown sugar, packed
½ c. canola oil
2 eggs
1 c. pumpkin puree
1 tsp. baking powder
½ tsp. baking soda
½ tsp. salt
1 tsp. pumpkin pie spice
½ tsp. cinnamon
1 tsp. vanilla
1/4 c. mini semi-sweet chocolate chips
3/4 c. semi-sweet chocolate chips

DIRECTIONS:
1. Preheat oven to 350 degrees. Line 2 muffin tins with 16 cupcake liners. Set aside.
2. In the bowl of a stand mixer, beat sugars, oil and pumpkin puree until smooth. Add vanilla and one egg, mix. Add the second egg and mix until combined.
3. In a medium size mixing bowl, whisk together flour, salt, baking powder, baking soda, cinnamon and pumpkin pie spice. With mixing speed on low, gradually and to wet ingredients. Mix until smooth. Remove bowl from stand and fold in the chocolate chips.
4. Scoop into liners filling each ¾ of the way full. Place in oven and bake for 20-23 minutes or until the tops are golden brown. Remove from oven and place pans on a wire rack to cool for 5 minutes before removing muffins and letting them cool on the rack for 15 minutes.
Adapted from Gourmet Magazine, Pumpkin Muffins | Makes approximately 16 standard size muffins

Fall 2012 Giveaway

8

Tuesday, October 2, 2012


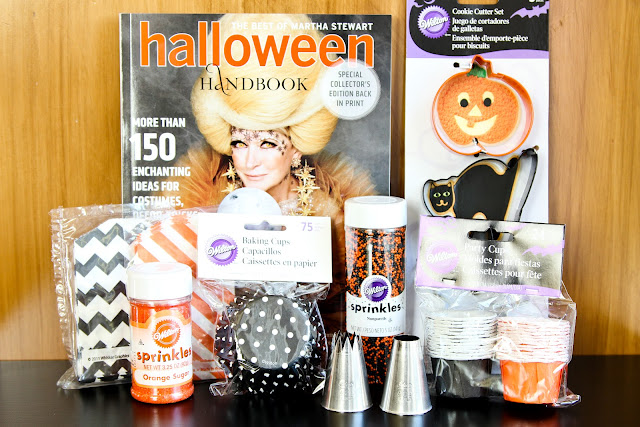
Last year around this time I held a giveaway and featured some really fun stuff to help kick start fall baking. Since it's that time of year I thought I'd do it again! Free stuff is always good, right?! Here are the fun things you can win...
... lots of goodies to help you throw a stylish Halloween party!
Just follow the guidelines below and check back on Monday, October 8th to see who won!

Terms & Conditions: This giveaway is not sponsored by Martha Stewart Magazine or Wilton®. All participants MUST live within the continental US. The winner will be chosen using Rafflecopter and will be notified via email on 10/6/2012. The winner must respond within 48 hours to claim their prize or another entry will chosen. Once the prize is claimed the winner will be announced here on the blog on 10/8/2012. Good luck :)

Blog Redesign: Pint Sized Baker

4

During the past few months I've been working with Karyn over at Pint Sized Baker to come up with a fresh look for her blog. This past Sunday the transformation was complete and the new site was revealed. Go check it out!

I really thought I took a screen shot of "the before" but I couldn't find it anywhere so I had to source a picture from the web.

Mini Pumpkin Cheesecakes with Gingersnap Crusts

79

Monday, October 1, 2012

October is here which means it is officially time to crank out the pumpkin recipes! Excited? I am! Last night we had the missionaries over for dinner and I made chili and cornbread. For dessert I had prepared these tasty little cheesecake bites. This was my first attempt at baking in my mini cheesecake pan and I had no idea what I was doing. Since I made my own recipe I was unsure of the baking/cooling time.... yeah, I winged it. Turns out that my guesses were pretty spot-on because these came out moist and oh so delicious! Happy October and let the pumpkin madness begin!

Mini Pumpkin Cheesecakes
Ingredients
1 package (8 oz) Original Philadelphia Cream Cheese, room temperature
½ c. pumpkin puree
¼ c. + 2 tbsp. sugar
1 egg
2 tsp. heavy cream
¼ tsp. vanilla
¼ tsp. cinnamon
¼ tsp. pumpkin pie spice (or allspice)
¹⁄₈ tsp. nutmeg

For the crust:
8 gingersnap cookies
1 graham cracker
1½  tbsp. melted butter
1½ tsp. brown sugar
¼ c. pecans
pinch of salt

For the vanilla bean whipped cream:
1 c. heavy cream
1 tbsp. granulated sugar
Seeds from ¼ a vanilla bean

Pumpkin pie spice for garnish

DIRECTIONS:
1. Preheat oven to 350 degrees. Lightly grease a mini cheesecake pan with baking spray. Set aside.
2. In the bowl of a food processor, grind all ingredients for crust, except for the melted butter. The mixture should resemble slightly coarse crumbs. Remove mixture and pour melted butter over. Mix until crumbs are wet. Press into the bottom of each hole. Place in oven and bake for 10 minutes.
3. While crust is baking prepare filling beating together cream cheese, sugar and pumpkin puree until smooth. Add spices, vanilla, heavy cream and egg. Mix until just combined.
4. Pour filling over each crust, dividing evenly. Place in oven and bake for 20 minutes. Remove from oven and cool in pan for 20 minutes before removing cheesecakes (yes your cheesecakes will sink a little, this is normal).
5. Remove cheesecakes from pan using the bottom of a wooden spoon. Using a butter knife, remove metal bottoms and place cheesecakes in an airtight container. Refrigerate for 2 hours before serving.
6. While cheesecakes are cooling, prepare vanilla bean whipped cream by fitting a chilled mixing bowl into your stand mixer. Add heavy cream, sugar and scraped vanilla bean seeds. Using the whisk attachment beat on high for 2-3 minutes until stiff peaks begin to form. Return to refrigerator until cheesecakes are ready to be served.
7. To assemble, using a mesh sieve, lightly dust cheesecakes with pumpkin pie spice before or after topping with a swirl of whipped cream. Enjoy!
Stephen + Natalie | Makes 12 mini cheesecakes using the Chicago Metallic Mini Cheesecake Pan

Life Made Simple All rights reserved © Blog Milk - Powered by Blogger