Mini Chocolate Raspberry Cheesecakes

13

Wednesday, November 28, 2012

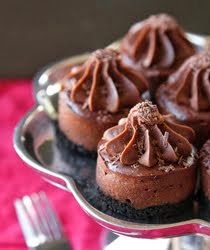
It's almost been a week since my last post! Somehow I've managed to get a bit off track. I blame it on the holiday and the fact that I've been a bit under the weather. Today I'm writing this from the comfort of my bed. I refuse to get out of it any sooner than I have to... which means I've got about another hour or so before I have to drag myself out and get ready for work. Sigh. Anyway, as you can probably tell, I'm slightly obsessed with my mini cheesecake pan. Admitting it is the first step, right? I would use it on a weekly basis if I could! So when Stephen asked me to make him a chocolate raspberry cheesecake, I knew exactly what to do. I scaled down a full-size cheesecake recipe and added a few extra ingredients. They became moist little bites of creamy goodness with beautiful swirls of raspberry sauce in them. Oh, and since I didn't want to be wasteful, I sunk a whole raspberry into the center of each- a nice little surprise!

Mini Chocolate Raspberry Cheesecakes
Ingredients
1 package (8 oz) Original Philadelphia Cream Cheese, room temperature
1/4 c. + 2 tbsp. sugar
3 tbsp. unsweetened cocoa powder
1 egg
2 tsp. heavy cream
1/4 tsp. vanilla bean paste
12 raspberries, rinsed and dried

For the raspberry swirl:
1/4 c. water
2 tbsp. sugar
1 c. raspberries

For the crust:
14 Oreo cookie halves (or 7 cookies with the filling removed)
1½ tbsp. melted butter
1 tsp. sugar
Pinch of salt

For the chocolate whipped cream:
1 c. heavy cream
4 tsp. confectioners sugar
2 tsp. unsweetened cocoa powder
Pinch of salt

Chocolate shavings for garnish

DIRECTIONS:
1. Preheat oven to 350 degrees. Lightly grease a mini cheesecake pan with baking spray. Set aside.
2. In the bowl of a food processor, grind all ingredients for crust, except for the melted butter. The mixture should resemble slightly coarse crumbs. Remove mixture and pour melted butter over. Mix until crumbs are wet. Press into the bottom of each hole. Place in oven and bake for 10 minutes.
3. To prepare the raspberry swirl, combine all ingredients in a medium size saucepan over medium heat. Reduce raspberries until they form a thick syrup. Remove and pour through a mesh sieve. Discard any seeds. Set the sauce aside.
4. To prepare the filling, beat together cream cheese, sugar and cocoa until smooth. Add vanilla, heavy cream and egg. Mix until just combined.
5. Pour filling over each crust, dividing evenly. Add a dollop of raspberry sauce to each and swirl using a toothpick. Place a raspberry in the center of each, making sure it is covered by the batter. Place in oven and bake for 20 minutes. Remove from oven and cool in pan for 20 minutes before removing cheesecakes (yes your cheesecakes will sink a little, this is normal).
6. Remove cheesecakes from pan using the bottom of a wooden spoon. Using a butter knife, remove metal bottoms and place cheesecakes in an airtight container. Refrigerate for 2 hours before serving.
7. While cheesecakes are cooling, prepare whipped cream by fitting a chilled mixing bowl into your stand mixer. Add heavy cream, sugar, salt, and cocoa. Using the whisk attachment beat on high for 2-3 minutes until stiff peaks begin to form. Return to refrigerator until cheesecakes are ready to be served.
8. To assemble top with a swirl of whipped cream and a pinch of chocolate shavings. Enjoy!
Adapted from Driscolls Decadent Chocolate Raspberry Cheesecake | Makes 12 mini cheesecakes using the Chicago Metallic Mini Cheesecake Pan

Happy Thanksgiving!

3

Thursday, November 22, 2012

We opted for a chicken this year, and well, I'm not sure if we'll ever go back! Happy Thanksgiving!!!

Maple Pecan Pie Bars

1

Wednesday, November 21, 2012

Well, the big day is almost here! Thanksgiving is tomorrow and I've been running around like crazy trying to get things ready. Tonight after work I'm coming home and making croissants, apple pie and mini chocolate raspberry cheesecakes (per Stephen's request). So much to do, so little time. Isn't that how it always is? I decided to start my baking early this year, mainly because of work and other obligations, but also because I don't want to wake up at 6am tomorrow just to spend the rest of the day in a hot kitchen. I love to bake, but I love to sleep even more. With that said, I made these maple pecan pie bars a few days ago. I figured we could snack on them throughout the week and then really savor the pie and cheesecake come turkey day. This recipe is great because you don't have to worry about making the perfect crust (kind of a big deal if you are like me and hate to flute the edges). I decided to add maple syrup to these to give them a little extra flavor and I think it did the trick! If you're looking for a quick & easy alternative to pie, give these a try, I think you're going to like them!

Maple Pecan Pie Bars
Ingredients
8 tbsp. (1 stick) butter
1 cup packed light brown sugar
¼ c. corn syrup
2 eggs
2 tbsp. heavy cream
3 tbsp. maple syrup
1 tsp. vanilla bean paste
Pinch of salt
2 c. pecans, chopped

For the crust:
2½ c. all-purpose flour
⅓ c. sugar
⅓ c. brown sugar, packed
16 tbsp. (2 sticks) butter, softened
½ teaspoon salt

DIRECTIONS:
1. Preheat oven to 350 degrees. Line a 9x13" pan with foil, leaving a 2" overhang on all sides, this will help you remove them from the pan.
2. In the bowl of a stand mixer, beat together butter, sugars, and salt until fluffy. With mixing speed on low, gradually add the flour and mix until it resembles coarse crumbs. Press the crust into the prepared pan. Prick a few times with a fork. Place in oven to bake for 20-25 minutes or until golden brown.
3. Meanwhile, to prepare the filling, in a medium size saucepan over low heat, melt butter. Once the butter has melted, add brown sugar, corn syrup, heavy cream, vanilla, maple syrup and salt. Turn heat up to medium and cook for 2-3 minutes (or until the sugar has dissolved and it begins to simmer). Remove from heat and allow to cool for 5 minutes. Once mixture has cooled, add eggs and pecans. Mix until combined.
4. Pour the mixture into the hot crust. Bake for 20-22 minutes (be careful not to over-bake or the sides will get burned). Remove from oven and allow to cool in pan for 30 minutes. Transfer to the freezer to chill for an additional 20 minutes. Remove, cut and serve.
Adapted from Epicurious, Pecan Pie Bars | Makes approximately 12-16 bars, depending on how you cut them

The Perfect Pie Topper: Thanksgiving

0

Tuesday, November 20, 2012


As you can probably tell I love bunting banners. I think they're even cuter when they're miniature size and strung atop a homemade pie. I thought this would be the perfect printable for this week!


Baked Pumpkin Spice Doughnuts

5

Monday, November 19, 2012

I couldn't help myself. I had to make pumpkin doughnuts. Had to. I've had these doughnut pans sitting in my cupboard for months now and I haven't used them. They've been staring me down. In my defense they were a good deal, just two George Washingtons! Can you believe that?! What a bargain. Anyway, I had some pumpkin puree hanging out in the fridge so I thought that while the pot roast was simmering away I'd toss in a few pans of doughnuts. Turns out that was the best idea I've had in a while. They came out looking amazing and tasting fantastic too! Nice and moist with lots of pumpkin flavor. I snacked on a few before dinner and a few more after. Yeah, they're addicting. Oh, and since I couldn't decide on glazed or sugared, I did both. The recipes below for the toppings are enough for you to do all of one kind☺

Baked Pumpkin Spice Doughnuts
Ingredients
1 c. all-purpose flour
1 c. pumpkin puree
½ c. brown sugar, packed
2 tbsp. vegetable oil
2 tbsp. butter, melted
1 egg
½ tsp. baking soda
¼ tsp. salt
1 tsp. cinnamon
½ tsp. pumpkin pie spice
¾ tsp. vanilla bean paste

For the cinnamon sugar:
½ c. sugar
½ tsp. cinnamon
½ tsp. pumpkin pie spice

For the chocolate glaze:
1 c. powdered sugar
1 tbsp. corn syrup
2 oz. bittersweet chocolate, chopped
4 tbsp. (½ stick) butter
3 tbsp. milk
1 tsp. vanilla
Pinch of sea salt

DIRECTIONS:
1. Preheat oven to 375 degrees. Lightly spray doughnut pans with cooking spray. Set aside.
2. In a medium size mixing bowl, whisk together flour, baking soda, cinnamon, pumpkin pie spice and salt, set aside.
3. In a small mixing bowl, combine sugar, egg, oil, butter, pumpkin, and vanilla bean paste. Using a spatula mix until smooth. Gradually add dry ingredients, mixing until just combined.
4. Pour mixture into a large pastry bag fitted with a round tip (the bigger the better). Pipe into prepared doughnut pans. Place in oven and bake for 12-15 minutes (standard size) or 9-10 minutes (mini), or until doughnuts are slightly springy. Remove from oven and allow to cool in pans for 5 minutes before transferring doughnuts to a wire rack to cool completely.
5. Meanwhile, to prepare the cinnamon sugar, combine cinnamon, sugar and pumpkin pie spice into a large ziplock bag. Shake to combine. When doughnuts are slightly warm, place in bag and shake to coat.
6. To prepare the chocolate glaze, in a small saucepan over low heat, melt butter. Once butter has melted add corn syrup, vanilla and sea salt. Add chocolate and whisk. Turn heat off and continue whisking until the mixture is smooth. Remove from heat, add milk, then powdered sugar. Dip doughnuts into the mixture, swirl to remove any excess. Garnish with sprinkles, nuts or sea salt.
Adapted from Turntable Kitchen, Baked Pumpkin Donuts | Makes approximately 8 standard doughnuts or 18 mini doughnuts ( I did 6 large and 8 mini)

Butternut Squash Soup with Spiced Cream

3

Friday, November 16, 2012

I'm kind of on a pumpkin/squash kick right now. Aside from all of the pumpkin goodies I've made, last week I made pumpkin risotto and yesterday I made this butternut squash soup. I started off by taking my halved (and cleaned) butternut squash and placing it onto a foil-line baking sheet. I brushed the halves with some olive oil and sprinkled them with sugar. I roasted them in the oven for 45 minutes at 400 degrees (time and temp will vary based on the size of your squash). I knew they were done after I had poked them at their thickest part with a knife, it should feel like your cutting into soft butter. I diced them up, set them aside and prepped the rest of my ingredients. Then it was just a matter of letting everything simmer for 20 minutes and immersion blending it all. Easy, right?! I wanted to add a little extra something to it, so I broke out my KitchenAid and made some spiced whipped cream. This is optional, but I think you'll find that it really helps to balance out the sweetness of the soup. Enjoy!

Butternut Squash Soup with Spiced Cream
Ingredients
1 butternut squash, halved, roasted and diced into 1" chunks
½ of a medium yellow onion, diced
3½ c. chicken broth
¼ c. heavy cream
2 tbsp. butter
½ tsp. ground ginger
¼ tsp. thyme
¹⁄₈ tsp. cayenne pepper
¼ tsp. ground black (or white) pepper
¼ tsp. sea salt
Juice of ½ a lemon

Spiced whipped cream:
½ c. heavy cream
¹⁄₈ tsp. cayenne pepper
pinch of salt

DIRECTIONS:
1. In a large dutch oven or stock pot over medium heat, melt butter. When butter is hot, add onion and cook until it becomes translucent. Add cooked squash and allow to cook for 3-4 minutes. 
2. Pour in chicken stock and bring to a low boil. Season with ginger, thyme, cayenne pepper, black pepper and salt. Allow mixture to cook for 20 minutes before removing from heat and immersion blending (or you can use a blender and puree it in batches). The soup should be smooth. Add in heavy cream, set over low heat while preparing the spiced whipped cream.
3. To make the spiced whipped cream, in the bowl of a stand mixer fitted with the whisk attachment, add cream, salt and cayenne pepper. Beat on high for 2-3 minutes or until stiff peaks form. Place a dollop in each bowl of soup. Serve immediately. 
Stephen + Natalie | Makes approximately 6 servings

Thanksgiving Recipe Cards

1

Thursday, November 15, 2012

Come fall I'm always on the hunt for recipe cards. It seems like no matter where I go I'm always sharing recipes or talking about food with someone. Since Thanksgiving is just around the corner, I thought I'd design a recipe card printable that would be both practical and festive. You can print these on paper or cardstock and use them for yourself or to give to others. (Please note that the original file is for a 3x5 card)

Cranberry-Orange Marmalade Muffins

5

Wednesday, November 14, 2012

 I'll be honest with you all, when I found out that the new GYCO challenge from White Lights on Wednesday and Four Marrs and One Venus was all about cranberries, I was a little nervous. Cranberries aren't really my thing. In fact I can't even remember the last time I ate something with cranberries in it. But since I don't like to turn down a challenge, I decided to do a little research and try out a muffin recipe. I feel like you can't go wrong with muffins, they're just one of those things you can't mess up. So I adapted a recipe, whipped it up and popped a pan into the oven. I was a bit nervous about the wet looking texture of them, but once they cooled and I glazed them, they turned out just fine! These muffins have a subtle orange flavor to them with flecks of zest and peel from the marmalade. The cranberries add a pop of tartness and zing. They're perfect for the season and will definitely brighten up your day!

Cranberry-Orange Marmalade Muffins
Ingredients
2 c. all-purpose flour
1 c. + 2 tbsp. sugar
4 tbsp. (½ stick) butter, melted
2 eggs
¼ c. sour cream, room temperature
¾ c. whole milk, room temperature
1 tbsp. baking powder
1 tsp. salt
Zest of 1 orange
2 tsp. orange extract
1 tsp. vanilla bean paste
¼ c. orange marmalade (I used Smucker's)
1½ c. fresh cranberries

Orange juice glaze:
1 c. powdered sugar
2 tbsp. orange juice
½ tsp. orange zest (optional)

DIRECTIONS:
1. Preheat oven to 350 degrees. Spray or line two muffin tins. Set aside.
2. In the bowl of a stand mixer combine butter, sugar, sour cream, and milk. Beat until smooth. Add vanilla bean paste, orange extract, and orange zest. Add one egg at a time, mixing well after each addition.
3. In a medium size mixing bowl, whisk together flour, baking powder and salt. With mixing speed on low, gradually add the dry ingredients. Mix until just combined.
4. Remove bowl from stand and gently fold in marmalade and cranberries, do not over-mix. Scoop batter into prepared pans filling each ¾ of the way full (be careful not to overfill). Place in oven and bake for 25 minutes or until the tops and edges begin to brown. Remove from oven and allow to cool in pans for 5 minutes. Transfer to a wire rack to cool completely before dipping in glaze (about 20 minutes).
5. While muffins are cooling, prepare the glaze by combining the orange juice, powdered sugar and zest in a small bowl. Whisk to combine or until the mixture is smooth and no powdered sugar lumps remain. Dip each cooled muffin into the glaze, keeping them upside down and swirling them to remove any excess glaze (this will prevent them from dripping). Let sit for 5 minutes before serving.
Adapted from Back In The Day Bakery, Cranberry-Orange Muffins | Makes approximately 16 muffins

It started snowing...

1

Tuesday, November 13, 2012

 ... and didn't stop.

Welcome to our winter wonderland! 
It's only mid November and look how much we have! 
7+ inches in just three days!
We're really excited!

Mini Eggnog Cheesecakes

9

Monday, November 12, 2012

Eggnog was never a holiday tradition in my house, in fact I just tried it for the first time yesterday! Stephen has told me time and time again how much he loves it, but somehow year after year I never get it for him. I'm a terrible person, I know. However, when I was at the grocery store this weekend I actually noticed it sitting there on the shelf, so I grabbed a bottle off it and shoved it in my cart. Needless to say I had one surprised and happy husband when I arrived home with it in hand! Yesterday afternoon we opened it and I tried some. It was thick and incredibly rich. I'm pretty sure I drank too much. Is that possible? It was sooo filling! I don't know, do you love it enough to drink a tall glass of it, or do you drink it in small amounts? Hmmm... anyway, I decided to use the last bit of it to make these mini cheesecakes. They turned out tasting amazing, and the best part? They were in creamy bite-sized portions! Everyone loved them, including me! (For those of you wondering about the pan, you can find it here.)

Mini Eggnog Cheesecakes
Ingredients
1 package (8 oz) original cream cheese, room temperature
¼ c. eggnog
1½ tbsp. all-purpose flour
½ c. sugar
1 egg
½ tsp. vanilla
¼ tsp. cinnamon
¹⁄₈ tsp. nutmeg

For the crust:
6 gingersnap cookies
2 graham crackers
1½  tbsp. melted butter
1½ tsp. brown sugar
pinch of salt

For the spiced vanilla bean whipped cream:
1 c. heavy cream
1 tbsp. granulated sugar
Seeds from ¼ a vanilla bean
1/8 tsp. nutmeg
1/8 tsp. cinnamon

DIRECTIONS:
1. Preheat oven to 350 degrees. Lightly grease a mini cheesecake pan with baking spray. Set aside.
2. In the bowl of a food processor, grind all ingredients for crust, except for the melted butter. The mixture should resemble slightly coarse crumbs. Remove mixture and pour melted butter over. Mix until crumbs are wet. Press into the bottom of each hole. Place in oven and bake for 10 minutes.
3. While crust is baking prepare filling beating together cream cheese, sugar, and eggnog until smooth. Add spices, vanilla, and egg. Mix until just combined. Fold in flour with spatula.
4. Pour filling over each crust, dividing evenly. Place in oven and bake for 20 minutes. Remove from oven and cool in pan for 20 minutes before removing cheesecakes (yes your cheesecakes will sink a little, this is normal).
5. Remove cheesecakes from pan using the bottom of a wooden spoon. Using a butter knife, remove metal bottoms and place cheesecakes in an airtight container. Refrigerate for 2 hours before serving.
6. While cheesecakes are cooling, prepare vanilla bean whipped cream by fitting a chilled mixing bowl into your stand mixer. Add heavy cream, sugar, scraped vanilla bean seeds, nutmeg and cinnamon. Using the whisk attachment beat on high for 2-3 minutes until stiff peaks begin to form. Return to refrigerator until cheesecakes are ready to be served.
7. To assemble top with a swirl of whipped cream.
Stephen + Natalie | Makes 12 mini cheesecakes using the Chicago Metallic Mini Cheesecake Pan

Potato Corn & Bacon Chowder

8

Friday, November 9, 2012

I absolutely love soup! My husband can attest to the fact that I make soup about 2-3 times a week. I'm not sure how much he loves it, but he never complains ;) This soup is one I've made before and keep coming back to. It's chunky, creamy and topped with crisp pieces of bacon. Let's be honest, everything is better with bacon! I like to add leek to it in the fall because it really gives the soup added flavor and texture. Also fresh corn is definitely the way to go but if you can't get your hands on some, try frozen. One thing I really love about this soup is that it comes together in 30 minutes... that and the fact that it's an entire meal in one bowl. It's hearty and filling and will definitely keep you coming back for more!

Potato Corn & Bacon Chowder
Ingredients
1 tbsp. all-purpose flour
1 tbsp. butter
1 c. whole milk or half & half
4 c. or (1) 32 oz. box chicken broth
3 slices of thick-cut bacon, cooked until crisp and diced
½ c. medium-sharp cheddar cheese, grated
3 russet potatoes, rinsed, peeled (optional) and cubed into 1" chunks
2 c. fresh corn
½ of a yellow onion, diced
1 leek, rinsed well and diced
1 clove garlic, minced
1 tsp. sea salt + a pinch for sweating
½ tsp. freshly ground black pepper
¹⁄₈ - ¼ tsp. cayenne pepper, depending on personal taste

DIRECTIONS:
1. Set a large stock pot or dutch oven over medium-low heat. Add butter and melt. When butter has melted add onion and leek. Add a pinch of salt to help the onion and leek sweat and cook for 4-5 minutes until tender and transparent. Add garlic and corn and cook for 3 more minutes.
2. Sprinkle in flour and whisk. Slowly add chicken broth and then milk. Turn heat up to medium-high, then add potatoes. Season with salt, pepper and cayenne. Simmer for 30 minutes or until potatoes are tender.
3. Once the potatoes are tender and the soup has thickened, turn heat off. Add in cheddar cheese and stir until incorporated. Spoon into individual bowls and top with crisp bacon pieces. Serve immediately.
Stephen + Natalie | Makes approximately 4-6 servings

Framed Fall Mantel Decor

0

Thursday, November 8, 2012

I love to come up with decorations for our mantle, but right now we're in that awkward phase where you have to put away the Halloween stuff but it's way too soon to bring out the Christmas decor. Having only Halloween decorations and really nothing for Thanksgiving or "fall," I decided to keep the pumpkins and the garland and put up a couple of vintage frames with fall spelled out in them. To make them I printed out the letters to fit in each frame (I had two 5x7 frames and two 4x6) and then backed them with a piece of burlap and a brown grocery bag. It was quick, simple and free!

Half & Half Pull-Apart Rolls

2

Wednesday, November 7, 2012

I've been in a whole wheat mood lately, which isn't very obvious when you look at my recent posts, but we do eat rather healthy meals for breakfast, lunch and dinner. Anyway, I've always loved homemade rolls, I don't think there's anything better than a warm roll topped with butter. So when I was looking for a recipe that could be easily adapted into a semi-whole wheat version, I turned to the Pioneer Woman. She's got a fantastic recipe for no-knead dinner rolls that you bake in muffin tins which is awesome for someone like myself that doesn't own a bread machine. These rolls are almost effortless, aside from rolling them into little balls and waiting for them to rise, you will definitely be able to finish prepping the rest of dinner while they do their thing. Oh, and if you want to go whole wheat all of the way, I applaud you ;) I'm sure they're just as tasty, we just prefer ours to be half & half. Enjoy!

Half & Half Pull-Apart Rolls
Ingredients
1 c. + 2 tbsp. all-purpose flour
1 c. + 2 tbsp. wheat flour
¼ c. sugar
¼ c. vegetable oil
1 c. whole milk
1¼ tsp. active dry yeast
1½ tsp. salt
¼ tsp. baking powder
¼ tsp. baking soda

DIRECTIONS:
1. Combine flours in a medium size mixing bowl, whisk together, then set aside.
2. In a dutch oven set over medium-low heat, combine milk, sugar and oil. Whisk to combine and allow mixture to heat to 110 degrees. Once the mixture has reached that point, turn the heat off and allow it to sit for about 20 minutes or until the temperature has reduced to 90 degrees.
3. Add the yeast, then 2 c. of flour. Using a spatula or a wooden spoon, mix until the flour is incorporated. Cover the dutch oven with a lid or towel and allow to rise in a warm spot for 1 hour.
4. When the dough has doubled, add baking powder, baking soda, salt and the remaining ¼ c. of flour, stir to combine.
5. Lightly spray or butter two standard size muffin pans.
6. Roll the dough into 1½" balls. Place three balls in each muffin cup. Cover each pan with plastic wrap and let rise for 2 hours. Preheat oven to 350 degrees and bake for 12-16 minutes or until the tops are golden brown. Remove from oven, allow to cool in pans for 5 minutes, then transfer to a wire rack to cool completely. (Optional: rub warm tops of rolls with butter)
NOTE: I've made these rolls several times and I found that baking them at 350 degrees yields the best results. The PW suggests 400 degrees but they burn in my oven after 8 minutes at that temperature!
Adapted from The Pioneer Woman, PW Dinner Rolls | Makes approximately 18 rolls

Cinnamon Topped Pumpkin Bread + A New Look

9

Tuesday, November 6, 2012

 These past few days have been kind of crazy for the two of us. Between school, work, church, and running a million errands, we really haven't been spending too much time at home. Yesterday I convinced myself that it was ok to relax a bit. I slept in, caught up on some work, and reheated leftovers for dinner. Yeah, it was one of those days. Today, however, was a little more productive. I went to the bank, the store, cleaned the house, and installed the new look for 2013. I know it's a little early but I didn't want to wait. I was tired of the same old thing and wanted to mix things up a bit. I can't tell you how much I love the templates that Blog Milk has over in their shop! I used Papier as the basis of the design and then imported my content. I love it! I know that a few other bloggers are using the same template right now, but the customization aspect really helps set each one apart. I also like that Blog Milk only releases 15 copies of each template, that way their sort of unique. Anyway, if you're looking to upgrade your look I highly recommend purchasing one of their templates, especially since custom design comes at a high cost... I'm talking upwards of $250 (and that's considered to be pretty cheap)!

Enough about that, now onto the bread! I only have a few more cans of pumpkin puree left in my pantry, and of course I was saving one for pumpkin bread, so here it is! I adapted a recipe that I found on allrecipes.com, and let me tell you, it was love at first bite. This bread is moist and sweet and covered in crunchy cinnamon goodness. It's everything a pumpkin lover could want and more! Seriously, this is good stuff people! I added the topping because I had some cinnamon chips and pecans, but if you're not a fan, just omit it, I promise it will be just as good! This bread would be awesome with a cream cheese swirl or studded with chocolate chips too... just throwing a few more ideas out there for you☺

Cinnamon Topped Pumpkin Bread
Ingredients
1¾ c. all-purpose flour
1 c. sugar
½ c. brown sugar, packed
⅓ c. water
¼ c. oil
¼ c. butter
1 c. pumpkin puree
2 eggs
1 tsp. baking soda
¾ tsp. salt
½ tsp. cinnamon
1 tsp. pumpkin pie spice
½ tsp. vanilla extract

Topping:
1 tbsp. flour
5 tbsp. brown sugar
1 tbsp. butter
1 tsp. cinnamon
¼ c. chopped pecans (optional)
¼ c. cinnamon baking chips (optional)

DIRECTIONS:
1. Preheat oven to 350 degrees. Spray one 8 x 4 inch loaf pan with baking spray. Set aside.
2. In the bowl of a stand mixer, beat together butter, oil, and sugars. Mix until smooth. Add pumpkin puree, water, and vanilla, mix until smooth. Add in one egg at a time, mixing after each addition.
3. In a medium mixing bowl, combine flour, baking soda, cinnamon and pumpkin pie spice. Whisk together. With mixing speed on low, gradually add dry ingredients. Mix until just incorporated.
4. Pour batter into prepared pan. Set aside.
5. To make the topping, in a small mixing bowl, combine flour, sugar and cinnamon. Cut in cold butter with a pastry blender. The mixture should resemble coarse crumbs. Sprinkle on top of batter along with nuts and cinnamon chips.
6. Place in oven and bake for 1 hour. The topping will begin to darken but should not burn. Remove from oven and let cool in pan on a wire rack for 1 hour before removing.
Adapted from allrecipes.com, Pumpkin Bread | Makes 1 standard loaf

Chicken and Chorizo Paella

1

Friday, November 2, 2012

Every time a chef on the Food Network made paella I would immediately change the channel. Since I don't like seafood I thought I would never be one to eat paella. I was wrong. You see a few weeks ago at work I was browsing through the menu for our class and lo and behold, there was paella. To my surprise no seafood was involved. I was a bit astonished. I guess I had always seen mounds and mounds of seafood in paella and never thought it could be prepared in any other way. Again, I was wrong. In fact there are several different kinds, but really it is adaptable to individual tastes (duck, rabbit, pork, chicken, seafood, or vegetarian). Anyway, I was so impressed with the chicken and chorizo paella that I had to make it at home. One thing I love about this dish is that aside from cooking the meats, it really is a one dish wonder (always a plus when you're the one that does the dishes). Since it is a main dish, we served ours up with a side salad and some fruit. It was super filling and full of great flavor! I hope you'll give this a try, it's a great meal for cooler weather and can be adjusted to serve a few or a crowd. Enjoy!

Chicken and Chorizo Paella
Ingredients
4 tbsp. olive oil
3-4 saffron threads
2 c. short-grain white rice (I used Bomba)
4 c. chicken broth
1 lb. chorizo, cooked and diced
1 lb. chicken, cooked and diced
4 cloves garlic, minced
1 yellow onion, diced
1 green bell pepper, diced
1 red bell pepper, diced
2 tomatoes, seeded and diced
1 c. thawed peas
4 tsp. smoked pimentón (Spanish paprika)
½ tsp. cayenne pepper

½ tsp. oregano
salt + freshly ground black pepper (season to taste)

DIRECTIONS:
1. In a medium size paella pan over medium heat, pour 2 tbsp. of olive oil into the pan and sprinkle in saffron threads. Heat until fragrant (be careful not to burn). Add garlic, onion, bell peppers, and tomato. Cook until soft, about 3-4 minutes.
2. Add remaining olive oil and pour in rice. Stir until rice is coated. Add chicken broth. Bring mixture to a simmer, then reduce heat. After about 15 minutes add chicken, chorizo, and peas. Cook until the broth is absorbed and the rice is tender. Cooking time will vary, for me it took about 25-28 minutes. Stir occasionally to prevent the rice from sticking to the bottom of the pan. 
3. Season with pimentón, cayenne pepper, oregano, salt, and black pepper. Serve immediately.
Adapted from Sur La Table, Chicken Shrimp and Chorizo Paella | Makes 6 servings

Life Made Simple All rights reserved © Blog Milk - Powered by Blogger