Criss Cross Peanut Butter Cookies

2

Friday, September 28, 2012

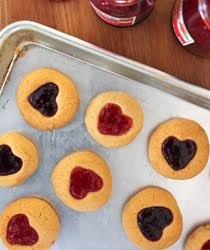
It was late in the afternoon when I decided I needed to bake up a batch of these cookies. Stephen's brother was on his way over for dinner and all we had for dessert was about 1 cup of peanut butter chunky monkey ice cream. I had planned on using it to make mini milkshakes but I thought we needed to have a little something more. Thankfully, these cookies only took a few minutes to whip up and once they came out of the oven they were ready to eat. As a peanut butter lover I thought that these definitely hit the mark. They're packed full of peanut butter flavor and the ground bits of peanuts only add to it! Yum!

Criss Cross Peanut Butter Cookies
Ingredients
1 c. all-purpose flour
½ c. brown sugar, packed
8 tbsp. (½ stick) butter, room temperature
½ c. smooth peanut butter
1 egg
¼ tsp. baking soda
¼ tsp. baking powder
½ tsp. salt
1 tsp. vanilla
⅓ c. ground peanuts (chopped to resemble coarse bread crumbs)
1 tsp. sea salt, for garnish

DIRECTIONS:
1. Preheat oven to 350 degrees. Line two baking sheets with parchment paper. Set aside.
2. In the bowl of a stand mixer, beat butter, peanut butter, sugar and vanilla until smooth and fluffy (about 3 minutes). Add egg, mixing until incorporated.
3. In a small mixing bowl, whisk together flour, baking soda, baking powder, salt and ground peanuts. With mixing speed on low, gradually add dry ingredients. Mix just until combined. Chill dough for 15 minutes before baking.
4. Scoop 2" balls onto prepared baking sheets (I put 6 on a sheet). Using a fork, press a criss cross pattern into each cookie, flattening them out a bit. Sprinkle with sea salt. Place into oven and bake for 12-14 minutes.
5. Remove from oven and let cool on sheet for 5 minutes before transferring to a wire rack to cool completely.
Adapted from The New Best Recipe, Peanut Butter Cookies | Makes 12 large cookies

Biscoff Coffee Cake Muffins

12

Wednesday, September 26, 2012

Yesterday fall finally crept in. We woke up to a cold dark house. I stumbled into the kitchen, opened the shutters and was pleasantly surprised to see that the mountains had been dusted with snow. While Stephen packed up his things and headed out the door to school, I rummaged around the kitchen looking for something to eat. While waiting for my oatmeal to cook I decided to make a small batch of coffee cake muffins. I stirred in some Biscoff spread to give them that 'spiced' flavor that I love so much. Out they came and I gobbled them up along with the rest of my breakfast. These will definitely become a staple in our house this fall, alongside those pumpkin cinnamon rolls and apple pie muffins. Waking up and eating freshly baked goods is probably the best way to start the day!

Biscoff Coffee Cake Muffins
Ingredients
1¾ c. all-purpose flour
1 c. sugar
8 tbsp. (1 sticks) butter, room temperature
2 large eggs
1 c. sour cream
1½ tsp. baking powder
¾ tsp. baking soda
¼ tsp. salt
¼ tsp. cinnamon
1 tsp. vanilla
3 tbsp. smooth Biscoff Spread

Topping:
½ c. all-purpose flour
¼ c. brown sugar
3 tbsp. butter, cold
1 tbsp. smooth Biscoff Spread
¼ tsp. salt
1 tsp. cinnamon

DIRECTIONS:
1. Preheat oven to 350 degrees. Line 2 standard size muffin tins (you might have a few empty liners at the end, just take them out if that's the case). Set aside.
2. To prepare topping, combine all ingredients in a small mixing bowl. Using a pastry blender, cut in Biscoff Spread and butter until the mixture resembles coarse crumbs. Set aside.
3. In the bowl of a stand mixer, beat butter, sugar and sour cream until smooth and fluffy. Add vanilla, cinnamon and one egg. Mix until incorporated. Add the last egg, mix just until incorporated.
4. In a small mixing bowl, whisk together flour, baking powder, baking soda and salt. With mixing speed on low, gradually add dry ingredients. When mixture is combined, remove 1 c. of batter. Place into a small bowl and add in Biscoff spread.
5. Divide batter between cupcake liners. Fill each ½ way full with normal batter. Scoop a dollop of Biscoff batter on top and swirl (this should make it so the liners are ⅔ - ¾ of the way full). Generously sprinkle each with crumble topping. Place in oven and bake for 22-25 minutes or until the top begins to brown.
6. Remove from oven and let muffins cool in pan for 5 minutes. Remove muffins and place on a wire rack to cool completely.
Adapted from Baked: New Frontiers in Baking, Sour Cream Coffee Cake | Makes approximately 18 standard size muffins

Crushed Pineapple Cupcakes

4

Monday, September 24, 2012

Yep. I'm finally saying goodbye to summer with these lovely pineapple cupcakes. You see a couple of weeks ago Stephen asked me to make him cupcakes. Not chocolate or vanilla, but pineapple. I was a little surprised. Pineapple, really? I had never heard of just plain ole pineapple cupcakes. I've see piña colada cupcakes, and with those most of their flavor is derived from the coconut. I thought a little about how I could make these cupcakes flavorful. That was when I remembered seeing pineapple cream cheese at the grocery store... of course, that would make an excellent frosting. Then it just came down to getting some flavor into the cupcake. By keeping most of the juice from the crushed pineapple and pureeing all of it, the cupcake would then be sweet and flavorful, eliminating any stringyness you might otherwise get if you didn't puree the pineapple. So I whipped up the batter, scooped it, tossed the pan in the oven and watched them bake. 10 minutes had passed and I grew nervous. No pineapple smell. Finally after about 18 minutes I could smell it. Hooray! I took them out, let them cool and frosted them. Stephen immediately appeared in the kitchen (he had been studying somewhere in the house) and snatched one up. We both agreed that these were a little taste of summer, perhaps our last. So with that, I'm officially moving onto Fall. Seriously. I have a feeling you're going to like what I have planned for these next few months, it involves a whole lot of sweet potatoes, pumpkin, peaches, apples and berries!

Crushed Pineapple Cupcakes
Ingredients
1¼ c. all-purpose flour
¾ c. sugar
2 tbsp. brown sugar
½ c. (1 stick) butter, room temperature
1 egg + 1 egg white
6 tbsp. sour cream
¾ tsp. baking powder
¼ tsp. baking soda
¼ tsp. salt
¾ tsp. vanilla
1 c. (8 oz. can) crushed pineapple, pureed

Pineapple buttercream:
2 c. powdered sugar
2 tbsp. butter, room temperature
6 tbsp. Philadelphia Pineapple Cream Cheese, room temperature
1 tsp. heavy cream
½ tsp. vanilla
Pinch of salt

DIRECTIONS:
1. Preheat oven to 350 degrees. Line one standard size muffin tin with liners, set aside.
2. In the bowl of a stand mixer, beat together butter, sour cream and sugars until light and fluffy. Add vanilla and eggs, mix just until incorporated.
3. In a medium size mixing bowl, combine flour, baking powder, baking soda and salt. With mixing speed on low, gradually add dry ingredients, mix until combined.
4. Remove bowl from stand and fold in crushed pineapple. Scoop into liners and fill each ¾ of the way full. Place in oven and bake for 20-22 minutes or until the tops are lightly golden in color. Remove from oven and let cool in pan for 5 minutes before transferring to a wire rack to cool completely.
5. Meanwhile, to prepare the buttercream, in the bowl of a stand mixer, beat together butter, cream cheese, vanilla and salt. With mixing speed on low, add powdered sugar. Add heavy cream and beat for 3-5 minutes until light and fluffy. Frost as desired.
Adapted from Glorious Treats, Pina Colada Cupcakes | Makes approximately 12 standard size cupcakes

Blueberry Peach Milkshake

1

Friday, September 21, 2012

This past Sunday we had Stephen's brother Adam over for dinner. I made chicken & noodles, homemade rolls, salad and peach crisp for dessert. I used every peach except for one... you can probably guess where that lone peach ended up... yep, right in there. If you love peaches and milkshakes as much as I do, then you're going to love this! Using only 4 ingredients you can whip up one of these in just minutes. I tossed in a handful of blueberries that had been sitting in our refrigerator, but don't feel pressured to go out and by some, it's great with out them too!
P.S. Tomorrow is the first day of fall! I know I should start my fall baking but I've still got a few more
recipes for you until I start cranking out apple and pumpkin treats, so hang tight, they're on their way!

4 Ingredient Blueberry Peach Milkshake
Ingredients
1 c. vanilla ice cream
1/2 c. milk
1 peach (peeled or unpeeled)
1/4 c. blueberries

DIRECTIONS:
1. In a blender combine ice cream, milk, pitted (peeled) peach, and blueberries. Blend on high for 1-2 minutes. Pour into a chilled glass and enjoy!
Stephen + Natalie Original Recipe | Makes 1 serving

Pozole Rojo + Homemade Tortillas

2

Wednesday, September 19, 2012

One of my favorite things to make as the weather beings to cool off is soup and/or stew. When I was planning out what to make this week Stephen buzzed in and wanted me to make Pozole. Apparently when we were browsing through one of my cookbooks he saw a recipe for it. I had no idea what Pozole was, but after reading through the ingredients I was entrigued. He begged me to make it, he even went to the store with me and helped pick out some of the ingredients. I guess he had eaten it a few times while serving his mission and grew to love it. He said the first time he was terrified because he didn't know what hominy was and started gagging. Great, I thought, you gagged... why are we making this?! He assured me that it was delicious and that he was just creeped out because he didn't realize hominy was just puffed corn. I told him I'd give it a try, but I was pretty skeptical.
He suggested serving it with a side of tortillas. Since store bought tortillas aren't very authentic I went to Pinterest and looked for homemade tortillas. I found a pin I had saved from a while back and followed the link. I was pleased with the comments and reviews it was given so I gave it a try. I added a bit of sugar and substituted some of the all-purpose flour for wheat flour. They turned out to be really tasty, along with the Pozole. Stephen was incredibly happy and I was pleasantly surprised by just how delicious it all was (really, I'm kind of a picky eater and I loved it)! He couldn't stop thanking me for making it and for doing such a good job. Success!

Pozole Rojo
Ingredients
2 lb pork roast
1 tbsp. olive oil
1 onion, diced
3 cloves garlic, minced
1 c. fire roasted diced tomatoes
1 lime, juiced
1 (29 oz) can hominy
5 c. chicken broth
1 c. boiling water + 1½ tbsp. ancho chili powder (dissolve)
½ tsp. dried oregano
Salt + Pepper

Garnishes:
Radish
Cilantro
Lettuce
Lime

DIRECTIONS:
1. Preheat oven to 325 degrees.
2. In a large dutch oven over medium heat, sautee onions and garlic in olive oil. Generously salt and pepper pork on both sides, set into dutch oven. Braise both sides (4-5 minutes on each side). Add tomatoes, oregano, and chicken broth. Bring mixture to a boil.
3. Cover dutch oven and place into oven. Bake for 2½ hours or until pork becomes tender and begins to fall apart. Remove from oven, using tongs place pork onto a cutting board and shred. Return to pot the stove top, turn heat to medium-high until broth begins to simmer. Place pork back in and add ancho chili mixture, hominy and lime juice. Simmer for 30 minutes. Garnish and serve.
Adapted from America's Test Kitchen, Pozole Rojo | Makes approximately 6 servings

Homemade Tortillas
Ingredients
2½ c. all-purpose flour
½ c. wheat flour
1 tsp. salt
1 tsp. sugar
½ tsp. baking powder
4 tbsp. canola oil
2 tbsp. butter, melted
1 c. hot water

DIRECTIONS:
1. In a medium size mixing bowl whisk together flour, salt, and baking powder.
2. Pour in canola oil and melted butter, gently mix together with fingers until oil/butter is incorporated and the mixture beings to form coarse crumbs.
3. Add hot water and keep mixing until a large ball is formed. Cover bowl tightly with plastic wrap and let the dough rest for 30-40 minutes.
4. Divide the dough into 12 equal size balls and roll out one at a time on a lightly floured surface. Place one rolled tortilla at a time into a hot, ungreased skillet over medium-high heat. Flip the tortilla when blisters form on the first side, continue heating the next side. Serve warm.
Adapted from Tasty Kitchen, Healthy Homemade Tortillas | Makes 12 soft taco size tortillas

Peanut Butter Chunky Monkey Ice Cream

15

Tuesday, September 18, 2012

A couple of weeks ago I signed up for the Get Your Chef On Challenge over at White Lights on Wendesday. Since participating in the Unique Sweet Challenge I've discovered that I really enjoy doing these sorts of things, especially when you get to see all of the yummy treats everyone else has made! This month's secret ingredient was peanut butter, Jenn couldn't have picked it any better. I love peanut butter almost to the point of obsession. It's incredibly versatile and can be used in both savory and sweet dishes. Of course I immediately wanted to make ice cream. I've been dying to make peanut butter ice cream so this was the perfect opportunity. Since I had some spotted bananas lying around, I decided to make it Peanut Butter Chunky Monkey Ice Cream. I started off by slicing the banana, tossing it in butter and brown sugar, and baking it for about 40 minutes. I chopped it up and transferred it to the freezer to chill. Then I made a simple no-cook base. You just put everything in a blender and give it a go.
Once it's nice and smooth you add a pinch of salt and some vanilla. Then mix for another minute or two. 
Since the base is already cold, there's no need to chill it. Just pour it into your ice cream maker (I use the KitchenAid attachment) and start churning! Meanwhile chop your walnuts, measure out your chocolate chips and get that peanut butter ripple going. I like to microwave it in a small bowl and whisk it over an ice bath to cool it down.
Once the ice cream has finished churning (25-30 minutes) fold in the bananas, walnuts, and chocolate chips. Pour the ice cream into a freezer safe container and layer it with the peanut butter swirl. Toss it in the freezer and let it set up for about 3-4 hours... I know, but you really do have to wait! Once it has set up, scoop and enjoy!

Peanut Butter Chunky Monkey Ice Cream
Ingredients
¾ c. sugar
2⅔ c. half & half
¾ c. smooth peanut butter
½ tsp. vanilla
pinch of salt
⅓ c. chopped walnuts
½ c. mini chocolate chips

For the roasted bananas:
1 banana
2 tbsp. brown sugar
1 tsp. butter

For the peanut butter swirl:
2 tbsp. brown sugar
1 tbsp. corn syrup
¼ c. half & half
¼ c. smooth peanut butter

DIRECTIONS:
1. Preheat oven to 400 degrees. Line one baking sheet with foil. Cut banana into slices and toss in a bowl with melted butter and brown sugar. Spread banana slices on sheet and bake for approximately 40  minutes. Remove from oven and chop into small chunks. Place in a freezer safe container and freeze until needed.
2. Assemble blender. Pour half & half into blender. Then add peanut butter and sugar. Blend for 2-3 minutes or until mixture is smooth and creamy. Add salt and vanilla, blend for an additional minute.
3. Pour mixture into ice cream maker. Churn according to manufacturers instructions (about 25-30 minutes). Meanwhile prepare the peanut butter swirl by combining ingredients in a small microwaveable bowl. Heat for 1 minute on high. Place over an ice bath and whisk until cool. Set aside. 
4. Chop walnuts and measure out chocolate chips. Remove bananas from freezer. Once mixture has churned, remove bowl and fold in bananas, walnuts, and chocolate chips. Pour ⅓ of the mixture into a freezer safe container. Drizzle peanut butter over top. Continue repeating these steps until all of the ice cream and peanut butter has been layered. Place in freezer and chill for 3-4 hours before serving.
Adapted from The Perfect Scoop, Peanut Butter Ice Cream | Makes approximately 6-8 Servings

Life according to instagram

0

Monday, September 17, 2012

A week or so ago we went to the Cheesecake Factory for dinner and got a huge slice of Oreo cheesecake for dessert. The Oreo on top was the size of a hockey puck... I was one happy camper! // I've finally started a semi-normal work schedule doing classes at Sur La Table. // This usually means my apron looks like a Jackson Pollock by the time we're through. // It ends up in that lovely pile of laundry that seems to be never ending. Seriously, how do we always have so much? // This past Thursday was my birthday and Stephen surprised me with a lot of really fun stuff including a giant Julius ({Paul Frank)! I case you don't know, I'm kind of obsessed with sock monkeys. // Saturday we drove up Little Cottonwood Canyon to the Alta Ski Resort. The canyon is just starting to turn red and orange... it's absolutely beautiful this time of year! We decided to hike up to Cecret Lake- what a view! I love being outdoors and now that the weather is starting to cool off, hiking will most definitely become our new weekend thing! 

Sweet Strawberry Cupcakes

10

Friday, September 14, 2012

A few weeks ago made strawberry cupcakes for the first time. I used Martha Stewart's "Sprinkles" recipe hoping it would produce a batch of tasty cupcakes. Unfortunately it was all wrong. They weren't horrible, but I certainly wasn't something I was going to share with all of you. I should have listened to the reviews a little more instead of thinking that they would turn out fine. I was a bit frustrated but I didn't want to give up. I decided to rework the recipe to try to figure out what was making them so bland. A couple of minutes later I had come up with a recipe that I was willing to try. I went out and bought frozen strawberries and some strawberry oil (because I couldn't find strawberry extract) to see if that would make a difference. I'm happy to say that along with those ingredients, the buttermilk, lemon zest and cake flour really helped turn this recipe into one I'd use time and time again. So if you're looking for a strawberry cupcake recipe that actually tastes like strawberries, go ahead and give this a try. Just remember to follow the recipe exactly. Resist getting fresh strawberries as hard as that may be, you won't regret it!

Strawberry Cupcakes
Ingredients
1 c. all-purpose flour
½ c. cake flour
1¼ c. sugar
8 tbsp. (1 stick) butter, room temperature
¼ c. buttermilk
⅔ c. frozen strawberry puree
½ tsp. strawberry oil (or ¾ tsp. strawberry extract)
2 eggs
1 tsp. vanilla
1 tsp. lemon zest
1 tsp. baking powder
¼ tsp. baking soda
¼ tsp. salt
1-2 drops red or pink food coloring
(note: if you choose to omit this, you will have slightly greyish cupcakes)

Strawberry buttercream:
2 - 2½ c. powdered sugar
½ c. (1 stick) butter, room temperature
2 tbsp. heavy cream
2 tbsp. frozen strawberry puree
1 tsp. vanilla
pinch of salt

DIRECTIONS:
1. Preheat oven to 350 degrees. Line one standard muffin tin with liners, set aside.
2. In food processor or blender, puree frozen strawberries. Warm puree in microwave for 30 seconds until it becomes smooth.
3. In the bowl of a stand mixer, beat together sugar and butter until light and fluffy. Add buttermilk, strawberry puree, strawberry oil (or extract), lemon zest and vanilla, mix until incorporated. Add one egg at a time, mix just until combined.
4. In a medium size mixing bowl, whisk together flour, cake flour, baking powder, baking soda. and salt. With mixing speed on low, gradually add to wet ingredients. Mix until just combined. Remove bowl from stand and fold in food coloring.
5. Fill each cupcake liner ¾ of the way full. Place in oven and bake for 24-26 minutes or until the tops begin to turn golden brown and the cupcakes spring back nicely when touched. Remove from oven and let cool in pan for 5-6 minutes. Transfer to a wire rack to cool completely.
6. While cupcakes are cooling, to prepare buttercream, in the bowl of a stand mixer fitted with the whisk attachment, beat together butter, heavy cream, strawberry puree, vanilla and salt (for about 1 minute). With mixing speed on low, gradually add the powdered sugar. Beat for 3-4 minutes until the frosting becomes light and fluffy. Pipe onto cooled cupcakes as desired.
Adapted from Martha Stewart, Sprinkles' Strawberry Cupcakes | Makes approximately 12 standard size cupcakes

I'm 24

4

Thursday, September 13, 2012

It's hard to believe that today I'm 24. Sometimes I feel like I'm still 19. Where have the years gone?
The other night at work someone asked me if I was old enough to serve alcohol. "I'm 23," I said. They were completely shocked. I'm not going to lie, that made me pretty happy. Anyway, today I'm being lazy. This afternoon I'm going to get my hair cut, watch TV, and wait for Stephen to come home. Tonight we'll go to Tucanos where I will most definitely stuff my face full of delicious Brazilian meats. It's kind of a tradition of ours. Then tomorrow I will continue on my merry way soaking up whatever 24 has to offer me. Hopefully good things... lots of them. I'm kind of excited to see what adventures I'll have, what fun things I'll do, just how much life will change. It seems like every year has been full of so many new experiences and challenges, I guess it's time for a few more :)

Salty Caramel Puddle Cookies

14

Wednesday, September 12, 2012

 
Who doesn't love a super chewy and chocolatey cookie? Stephen and I had been craving something with chocolate in it, so I made a half batch of these. They came out soft in the center and tasted like a brownie would. They were absolutely decadent! The combination of chocolate and caramel along with the added nuts and sea salt is heavenly! Oh, and trust me, these aren't going to be super salty, they've just got the perfect hint of salt which you can omit if desired. If you need something to satisfy your sweet tooth, I'd highly recommend making some of these!

Salty Caramel Chocolate Cookies
Ingredients
16 oz. semisweet or bittersweet Ghiradelli chocolate
½ c. + 2 tbsp. all-purpose flour
1¾ c. brown sugar
4 tbsp. butter, room temperature
4 eggs
1 tsp. baking powder
½ tsp. salt
1 tbsp. vanilla
1 Ghiradelli Sea Salt Soiree Bar, coarsely chopped
16 soft caramels, chopped into very small bits
Sea salt for garnish (optional)

DIRECTIONS:
1. Preaheat oven to 350 degrees. Line 2 baking sheets with parchment paper (or a silpat mat), set aside.
2. In a double broiler, melt butter and plain chocolate. Remove from heat when smooth.
3. In the bowl of a stand mixer, beat together sugar and eggs. Add vanilla and cooled chocolate/butter mixture. Mix until incorporated.
4. In a small mixing bowl, whisk together flour, baking powder and salt. With mixing speed on low, gradually add, mix until just combined. Remove bowl from stand and fold in chopped caramel bits and chopped Sea Salt Soiree bar. Chill in refrigerator for at least 45 minutes (you have to refrigerate the dough).
5. Scoop 2" balls onto a lined baking sheet and sprinkle with sea salt. Place in oven and bake for 15-17 minutes or until edges look set. Remove from oven and allow to cool on sheet for 5-10 minutes. Transfer cookies to a wire rack to cool completely.
Adapted from Bon Appétit, Giant Chocolate-Toffee Cookies | Make approximately 2 dozen
Blueberry Crumble Muffins

1

Monday, September 10, 2012

Summer isn't over yet, right?! I refuse to give up all of the yummy fruit we've been eating, especially blueberries! Don't get me wrong, I've got my fall baking all planned out (crazy, I know) but I there are few things greater than fresh fruit. So until September is over, I will be sharing with you a handful of summery recipes. Deal? I'll start off with these muffins. They make a perfect morning treat or a tasty afternoon snack. I've loaded them up with fresh berries and topped them with a sweet crunchy crumble. If you're looking to lighten things up a bit, you can always use low-fat sour cream, yogurt and milk (and even egg whites too). Enjoy!

Blueberry Crumble Muffins
Ingredients
2 c. all-purpose flour
1 c. sugar
4 tbsp. (¼ stick) butter, room temperature
1 egg
1 c. sour cream
⅓ c. blueberry yogurt
½ c. milk
1 tsp. vanilla
½ tsp. salt
1 tbsp. baking powder
1½ c. fresh or frozen blueberries

Crumb topping:
⅓ c. flour
2 tbsp. sugar
¼ c. brown sugar
4 tbsp. (¼ stick) butter, cold

DIRECTIONS:
1. Preheat oven to 350 degrees. Prepare 2 muffin tins, set aside.
2. To prepare crumb topping, combine all ingredients in a small mixing bowl. Using a pastry blender, cut butter until mixture resembles coarse crumbs, set aside.
3. In the bowl of a stand mixer, beat together butter and sugar until light and fluffy. Add sour cream, yogurt and milk, mix until smooth (2 minutes or so). Add vanilla and egg, mix until incorporated.
4. In a medium size mixing bowl, whisk together flour, salt, and baking powder. With mixing speed on low, gradually add dry ingredients.
5. Remove bowl from stand, gently fold in blueberries. Scoop into muffin tins, filling each ¾ of the way full. Generously sprinkle tops with crumble. Place in oven and bake for 22-24 minutes, or until the tops turn golden brown in color.
6. Remove from oven and let cool in tins for 5-6 minutes. Transfer to a wire rack to cool completely.
Adapted from The New Best Recipe, Blueberry Muffins | Makes approximately 16 muffins

Browned Butter Toffee Pecan Bites

2

Thursday, September 6, 2012

It's funny how much I've neglected some of my baking supplies. I guess I've been in an ice cream/cookie bar funk. Now that I have a big beautiful kitchen to cook/bake in, I've actually pulled certain things out, dusted them off and started using them (like my mini loaf pan and mini pie maker). I just feel like things have been getting a bit static around here. Variety is the spice of life, right? That being said, this recipe uses a pan that I've only used ONCE: a mini cupcake pan. I used it a while ago for mini blueberry muffins, but I'm sad to say that is the only thing I have used it for. I even have some really cute liners for it. What a shame. Hopefully one day I'll use it for its intended purpose, who knows, maybe in the near future. Anyway, this past weekend we were craving something sweet. Since we both like toffee and nuts, I made a half batch of dough and baked up these little bites. I decided to brown the  butter, which makes it taste more nutty (and is fantastic in anything, but especially in this bread) because I figured that it would compliment the pecans nicely. These turned out to be really tasty, so much that they were gone in a few hours! Whether you brown the butter or not, these are definitely a great little treat!

Browned Butter Toffee Pecan Bites
Ingredients
3/4 c. all-purpose flour
3/4 c. brown sugar
6 tbsp. (3/4 stick) butter, room temperature
1 egg
1/2 tsp. baking powder
1/2 tsp. salt
3/4 tsp. vanilla
1/3 c. Health toffee bits
1/3 c. chopped pecans
Optional addition: 1/4 c. mini chocolate chips

DIRECTIONS:
1. Preheat oven to 350 degrees. Prepare a mini cupcake pan by lightly spraying it with Pam. Set aside.
2. In a medium size mixing bowl, whisk together flour, baking powder and salt. Set aside.
3. In a small saucepan over medium heat, melt butter. As butter begins to cook it will start to foam around the edges. When the foam and crackling stops it will begin to brown. During this process, swirl the pan to prevent burning. When the butter smells nutty remove the pan from the heat immediately and transfer into the bowl of a stand mixer (this will stop the cooking process). Allow to cool for 3-4 minutes.
4. In the bowl of a stand mixer, beat together butter and brown sugar for 30 seconds. Turn speed to low and add one egg at a time. Add vanilla and mix until combined.
5. Remove bowl from stand mixer. Fold in dry ingredients. Do not overmix. Gently fold in toffee bits and chopped pecans (mini chocolate chips too, if desired).
6. Scoop dough into prepared cupcake pan, filling each 3/4 of the way full. Place in oven and bake for 10-12 minutes or until the cookie bites are golden brown in color (just remember if you're using a non-stick pan, they'll brown a lot more around the edges, so don't let them bake for too long). Remove from oven and let cool in pan for 5 minutes. Transfer to a wire rack to cool completely.
Adapted from America's Test Kitchen- Blondies | Makes approximately 18-24 mini bites

Design 101 Series: Backgrounds & Free Graphics

0

Wednesday, September 5, 2012

Lately I've been working on a lot of blog redesigns. I've searched far and wide for clean and modern backgrounds. They're hard to find! However, I recently stumbled upon this website. Jackpot! And the best part? They're free!
Tip #1: If you're wanting to customize the color or opacity of the pattern, they suggest following this tutorial.
Tip #2: In Blogger, when setting your background, make sure you select the top left alignment option and that you check the box titled "scroll with page," this will make it easier to read for viewers, especially if you have a busy background.
Tip #3: In general, you should try not to tile a background unless it is seamless. Often times when tiling, you can see the separation between the patterns or it doesn't match up correctly.

And of course, if you're looking to make your own background or just need some graphics for a project, both Brusheezy and Vecteezy have some great downloads (you'll need Adobe Photoshop & Illustrator to edit them). Not sure what I'm talking about? Brusheezy offers patterns and brushes to use in Photoshop/Illustrator, and Vecteezy offers vectors you can download and use or customize in Illustrator.
Tip #1: Vecteezy: Downloaded the file, open it as an Ai file or EPS. Use the direct selection tool (the "grey" cursor) to enable editing capabilities.
Tip #2: Brusheezy: Download the file, open Photoshop and select the brush tool. To load the brush, open up the brush selection box and click on the arrow in the top right hand corner. In the middle of the menu you will see "load brushes." Click and find the file. Once you've selected and opened that brush it will be located in the brush selection box for you to use.


Please note that these backgrounds and graphics are for personal use only (non-commercial). Always read the terms.

Chicken Veggie Pizza + A Dough Recipe

6

Tuesday, September 4, 2012

One of my favorite pizzas comes from Round Table Pizza. It's the Gourmet Veggie and it's topped with all sorts of good things. I haven't had a slice of that for quite some time now, so when Stephen suggested we make pizza, I immediately wanted to try to make my own version of it. I was hesitant at first, mainly because I wasn't sure if he'd like it, but I convinced him by adding chicken and spicing the sauce up a bit that he would. The following day when I began prepping the veggies I realized I hadn't made the dough. How could I forget that? It's the most important part! Obviously there was no way I'd be able to make my favorite dough (it takes 18 hours to ferment), so I went to this cookbook to see what I could come up with. I found a recipe for pizza dough with a few different rising options. When I browsed through the ingredient list I had all of the ingredients but they were a little off. No bread flour and no instant yeast. I decided to go ahead and give it a try with what I had. It was great (not super bready and a nice crisp crust)! Turns out that we both loved the pizza and that I have the go-ahead to make it again. So if you're looking to sneak in some veggies, give this a try, I think you're going to be pleasantly surprised, and your family be will too!

Chicken Veggie Pizza
Ingredients
1 ball dough (see recipe below)
1 small tomato, diced
¼ onion red onion, thinly sliced
1 small zucchini, sliced thinly
1 small yellow squash, sliced thinly
4 chicken tenders, cooked and diced (seasoned accordingly)
1 c. shredded mozzarella cheese
¼ c. shredded jack cheese
¼ tsp. oregano
½ tsp. red pepper flakes
¼ tsp. garlic powder
pinch of salt and pepper

Alfredo-ranch sauce:
¼ c. heavy cream
1 T. butter
¼ c. freshly grated parmesan
2 cloves garlic, minced
2 tsp. flour
1 tbsp. chicken stock or broth
¹⁄₈ c. ranch dressing
sprinkle of cayenne pepper
pinch of salt
¹⁄₈ tsp. ground pepper

DIRECTIONS:
1. To make sauce, in a small saucepan, melt butter. Add minced garlic, stir and cook for 1 minute. Add flour, cook for 1 minute. Add heavy cream and chicken broth, whisk. As mixture thickens, slowly add parmesan, whisk until smooth. Sprinkle in salt and peppers. Remove from heat and let cool for 10 minutes. Add ranch, mix until incorporated.
2. Spread sauce evenly over pizza peel, leaving about 1½ inches around the edge for the crust. Sprinkle shredded cheeses on top. Then place cooked/diced chicken and veggies on top. Sprinkle oregano, red pepper, garlic powder salt and pepper over entire pizza.
3. Bake for 12-14 minutes at 450 degrees. Remove, let cool for 5-6 minutes, slice and serve.

Pizza Dough
Ingredients
½ c. warm water
1¼ c. room temperature water
2½ tsp. active yeast
1 tsp. sugar
1½ tsp. salt
2 tbsp. olive oil
4 c. all-purpose flour

DIRECTIONS:
1. In a 2-cup liquid measuring cup, add warm water and yeast. Sprinkle sugar over top and allow to sit for 5-7 minutes or until the mixture begins to puff. Add the oil and the room temperature water. Whisk gently to combine.
2. In the bowl of a stand mixer fit with the paddle attachment, combine salt, flour, and water mixture. When dough begins to form a ball, remove paddle attachment and replace with dough hook. With mixing speed on low, knead dough for 2-3 minutes or until a ball begins to form and the dough becomes smooth and elastic. 
3. Remove dough from bowl and place in a large well-greased bowl (I prefer using olive oil, but you can also use Pam). Cover bowl tightly with plastic wrap and allow to rise for 2 hours. 
4. To deflate dough, punch with fist. Turn onto a lightly floured surface and divide into two or three balls (depending on how big and how many pizzas you want to make... I make 2). Form into pizza shells to fit the size of your pan. Place on a lightly greased pan (or one that has been dusted with flour or cornmeal). Continue with directions above.
Note: I like to refrigerate the other ball of dough I have left over and use it the following day. Just place it in a LARGE ziplock bag and remove all air. It will rise a bit in the refrigerator, so be aware of this.
Adapted from The New Best Recipe, Pizza Dough | Makes enough for 2 large pizzas or 3 medium pizzas

Life Made Simple All rights reserved © Blog Milk - Powered by Blogger